How to use Firebase Authentication with Wized & Xano
.png)
Integrating Firebase Authentication in your Wized/Xano build can streamline user management and security across your app, and make your life easier when developing social oauth, such as Google, Microsoft, and Apple. By following this step-by-step guide, you'll ensure that user sign-ups and logins are handled smoothly, with users properly authenticated and stored across both Firebase and Xano platforms. This will allow you to use the native Xano API authentication while outsourcing the authentication process to Firebase.
Demo
Set-up
In Firebase
1. Go to console.firebase.google.com and create a project
.png)
2. Enable Authentication
.png)
.png)
.png)
3. Add Providers
.png)
.png)
.png)
.png)
If you are enabling the Microsoft Provider, you can follow this official tutorial.
At the time of writing, these are the steps:
- Create a Microsoft account and log in at https://entra.microsoft.com
- Go to Identity ➝ Applications ➝ App registrations
.png)
.png)
.png)
- For Supported account types, select depending on the application. Multitenant means that any microsoft account can register or log in.
- For redirect uri, copy the one from Firebase
.png)
- Copy the Application ID to Firebase
.png)
.png)
- Go to Certificates & Secrets
.png)
.png)
- Please note that it has an expiration date, so you will need o change it at some point. You can select 12 months for the expiration
.png)
.png)
4. Create a web project
.png)
.png)
.png)
.png)
Once created, click continue to dashboard
In Xano
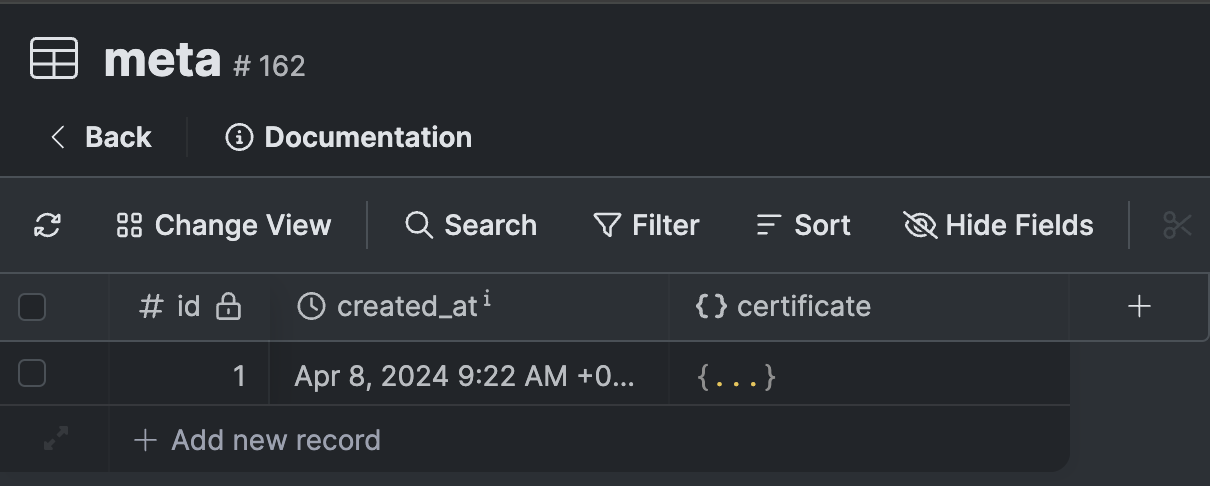
1. Create a database with 1 item
.png)
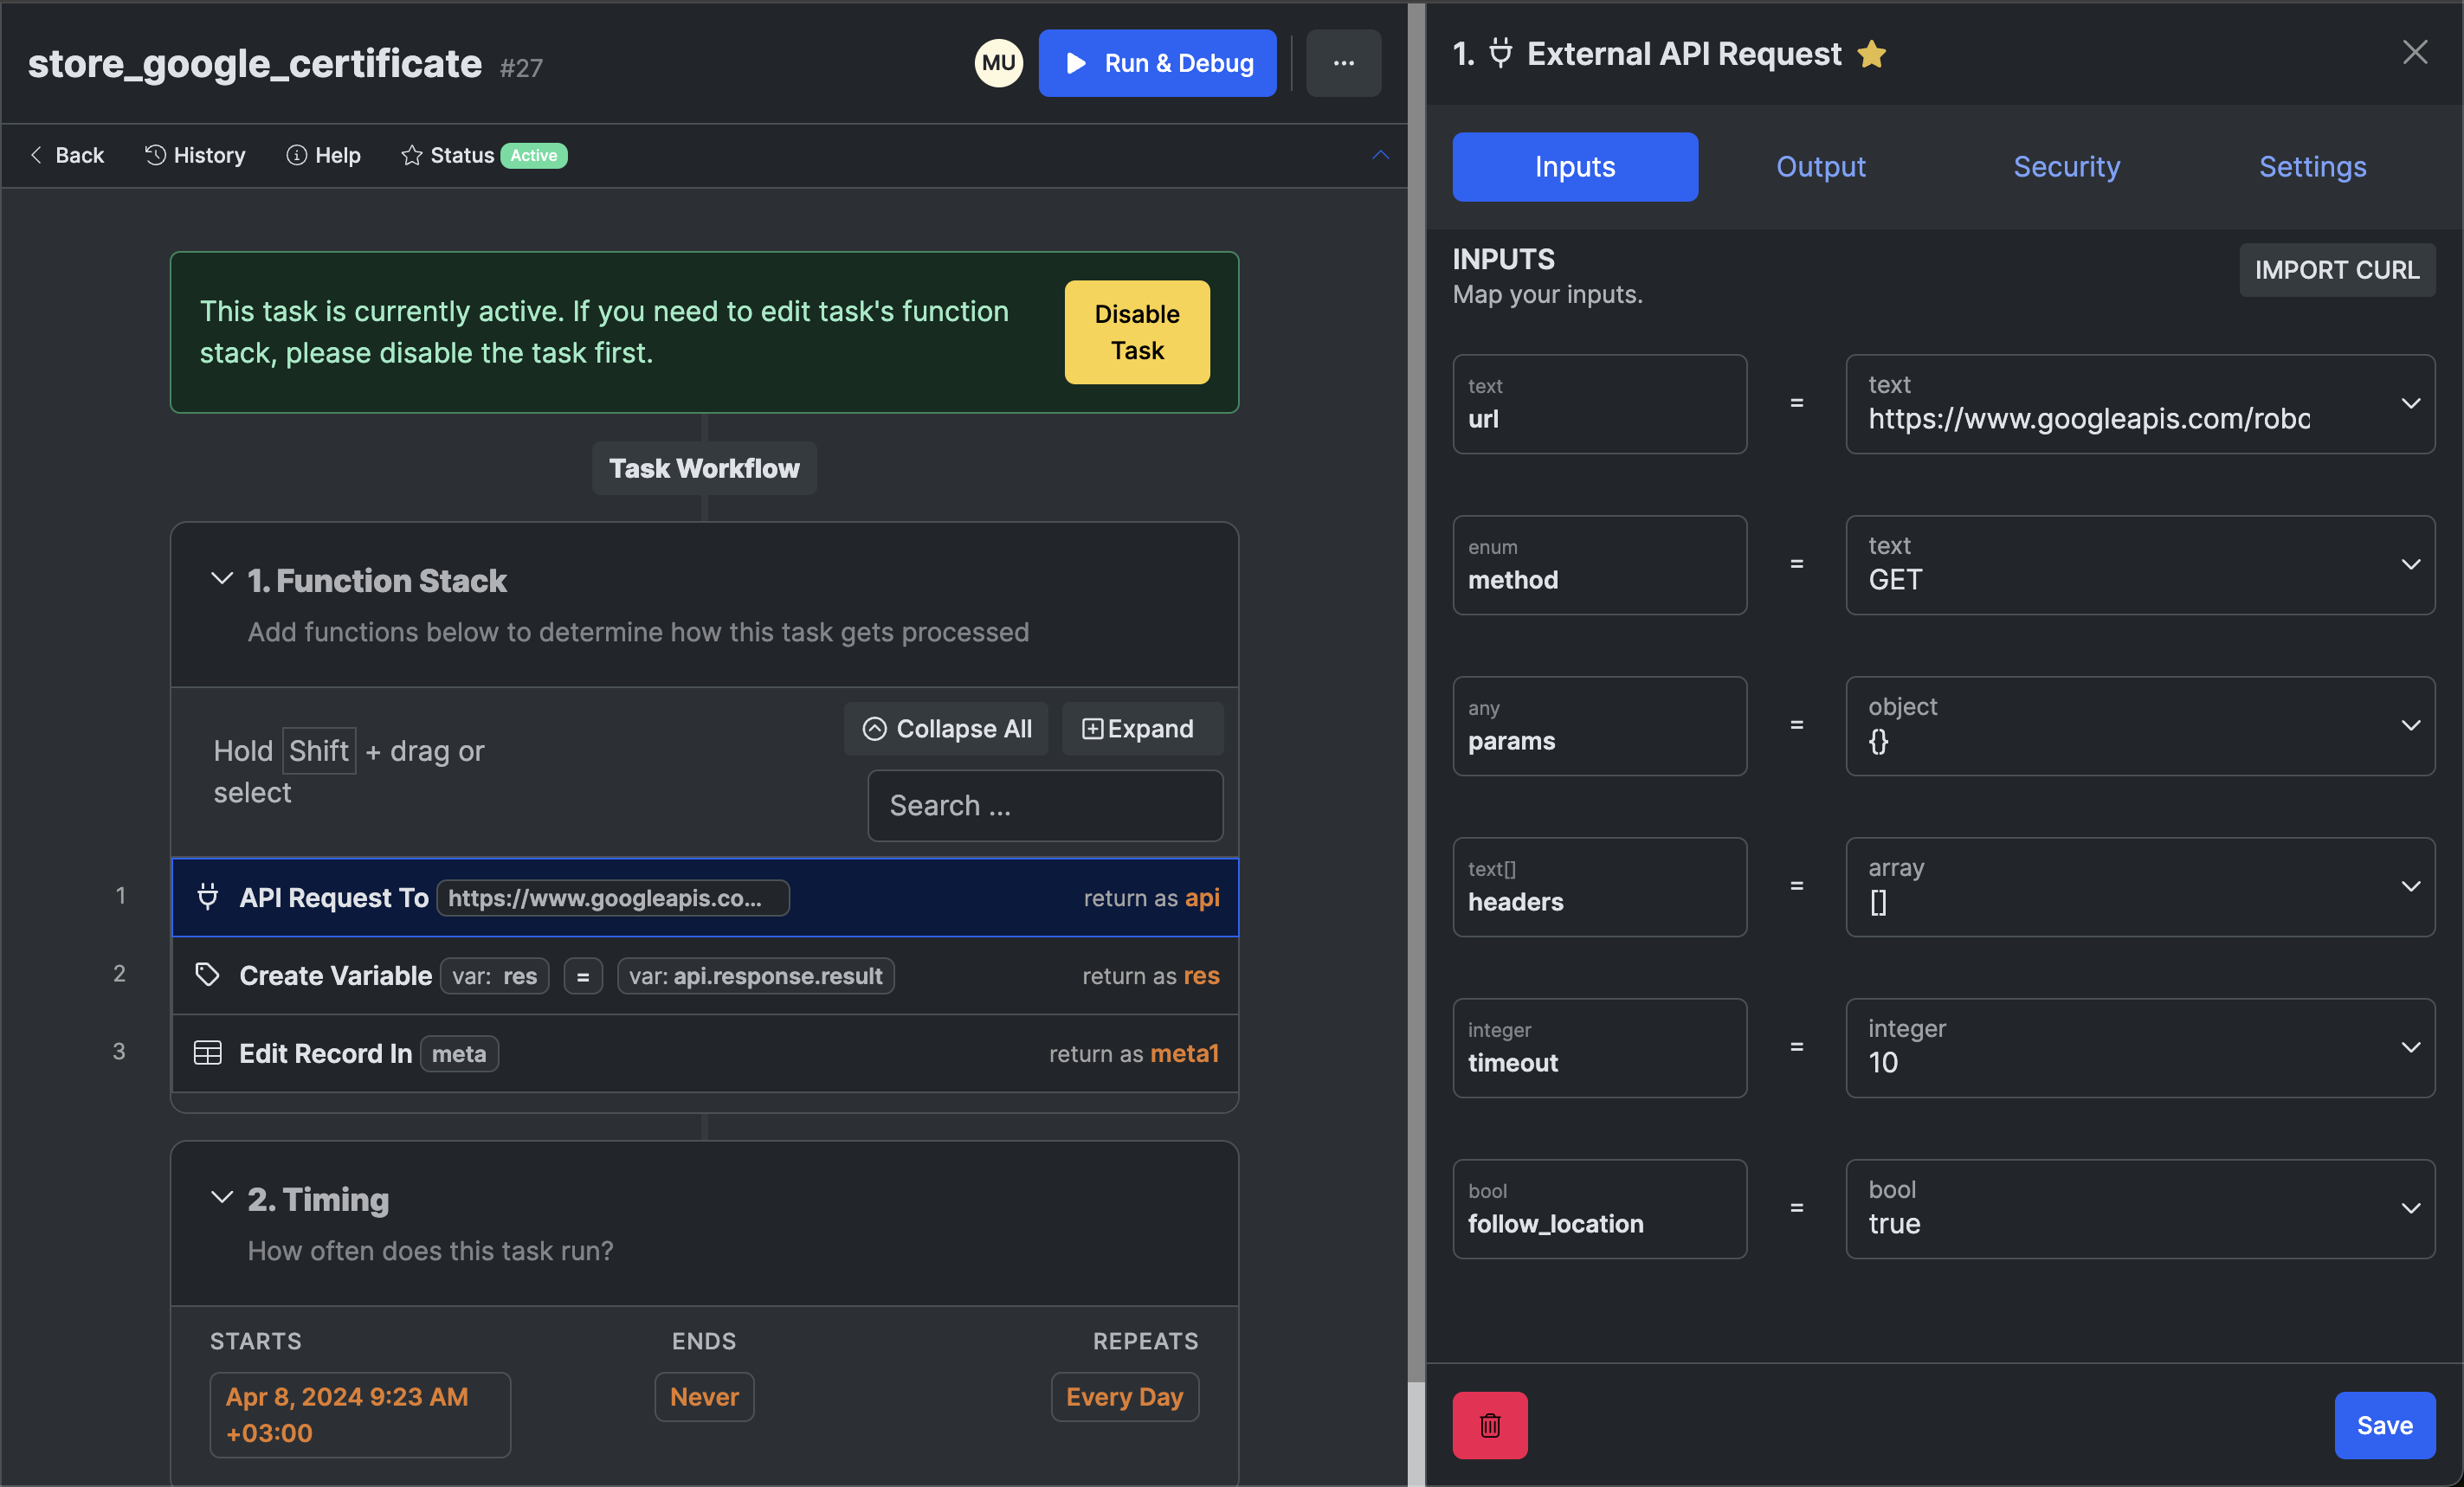
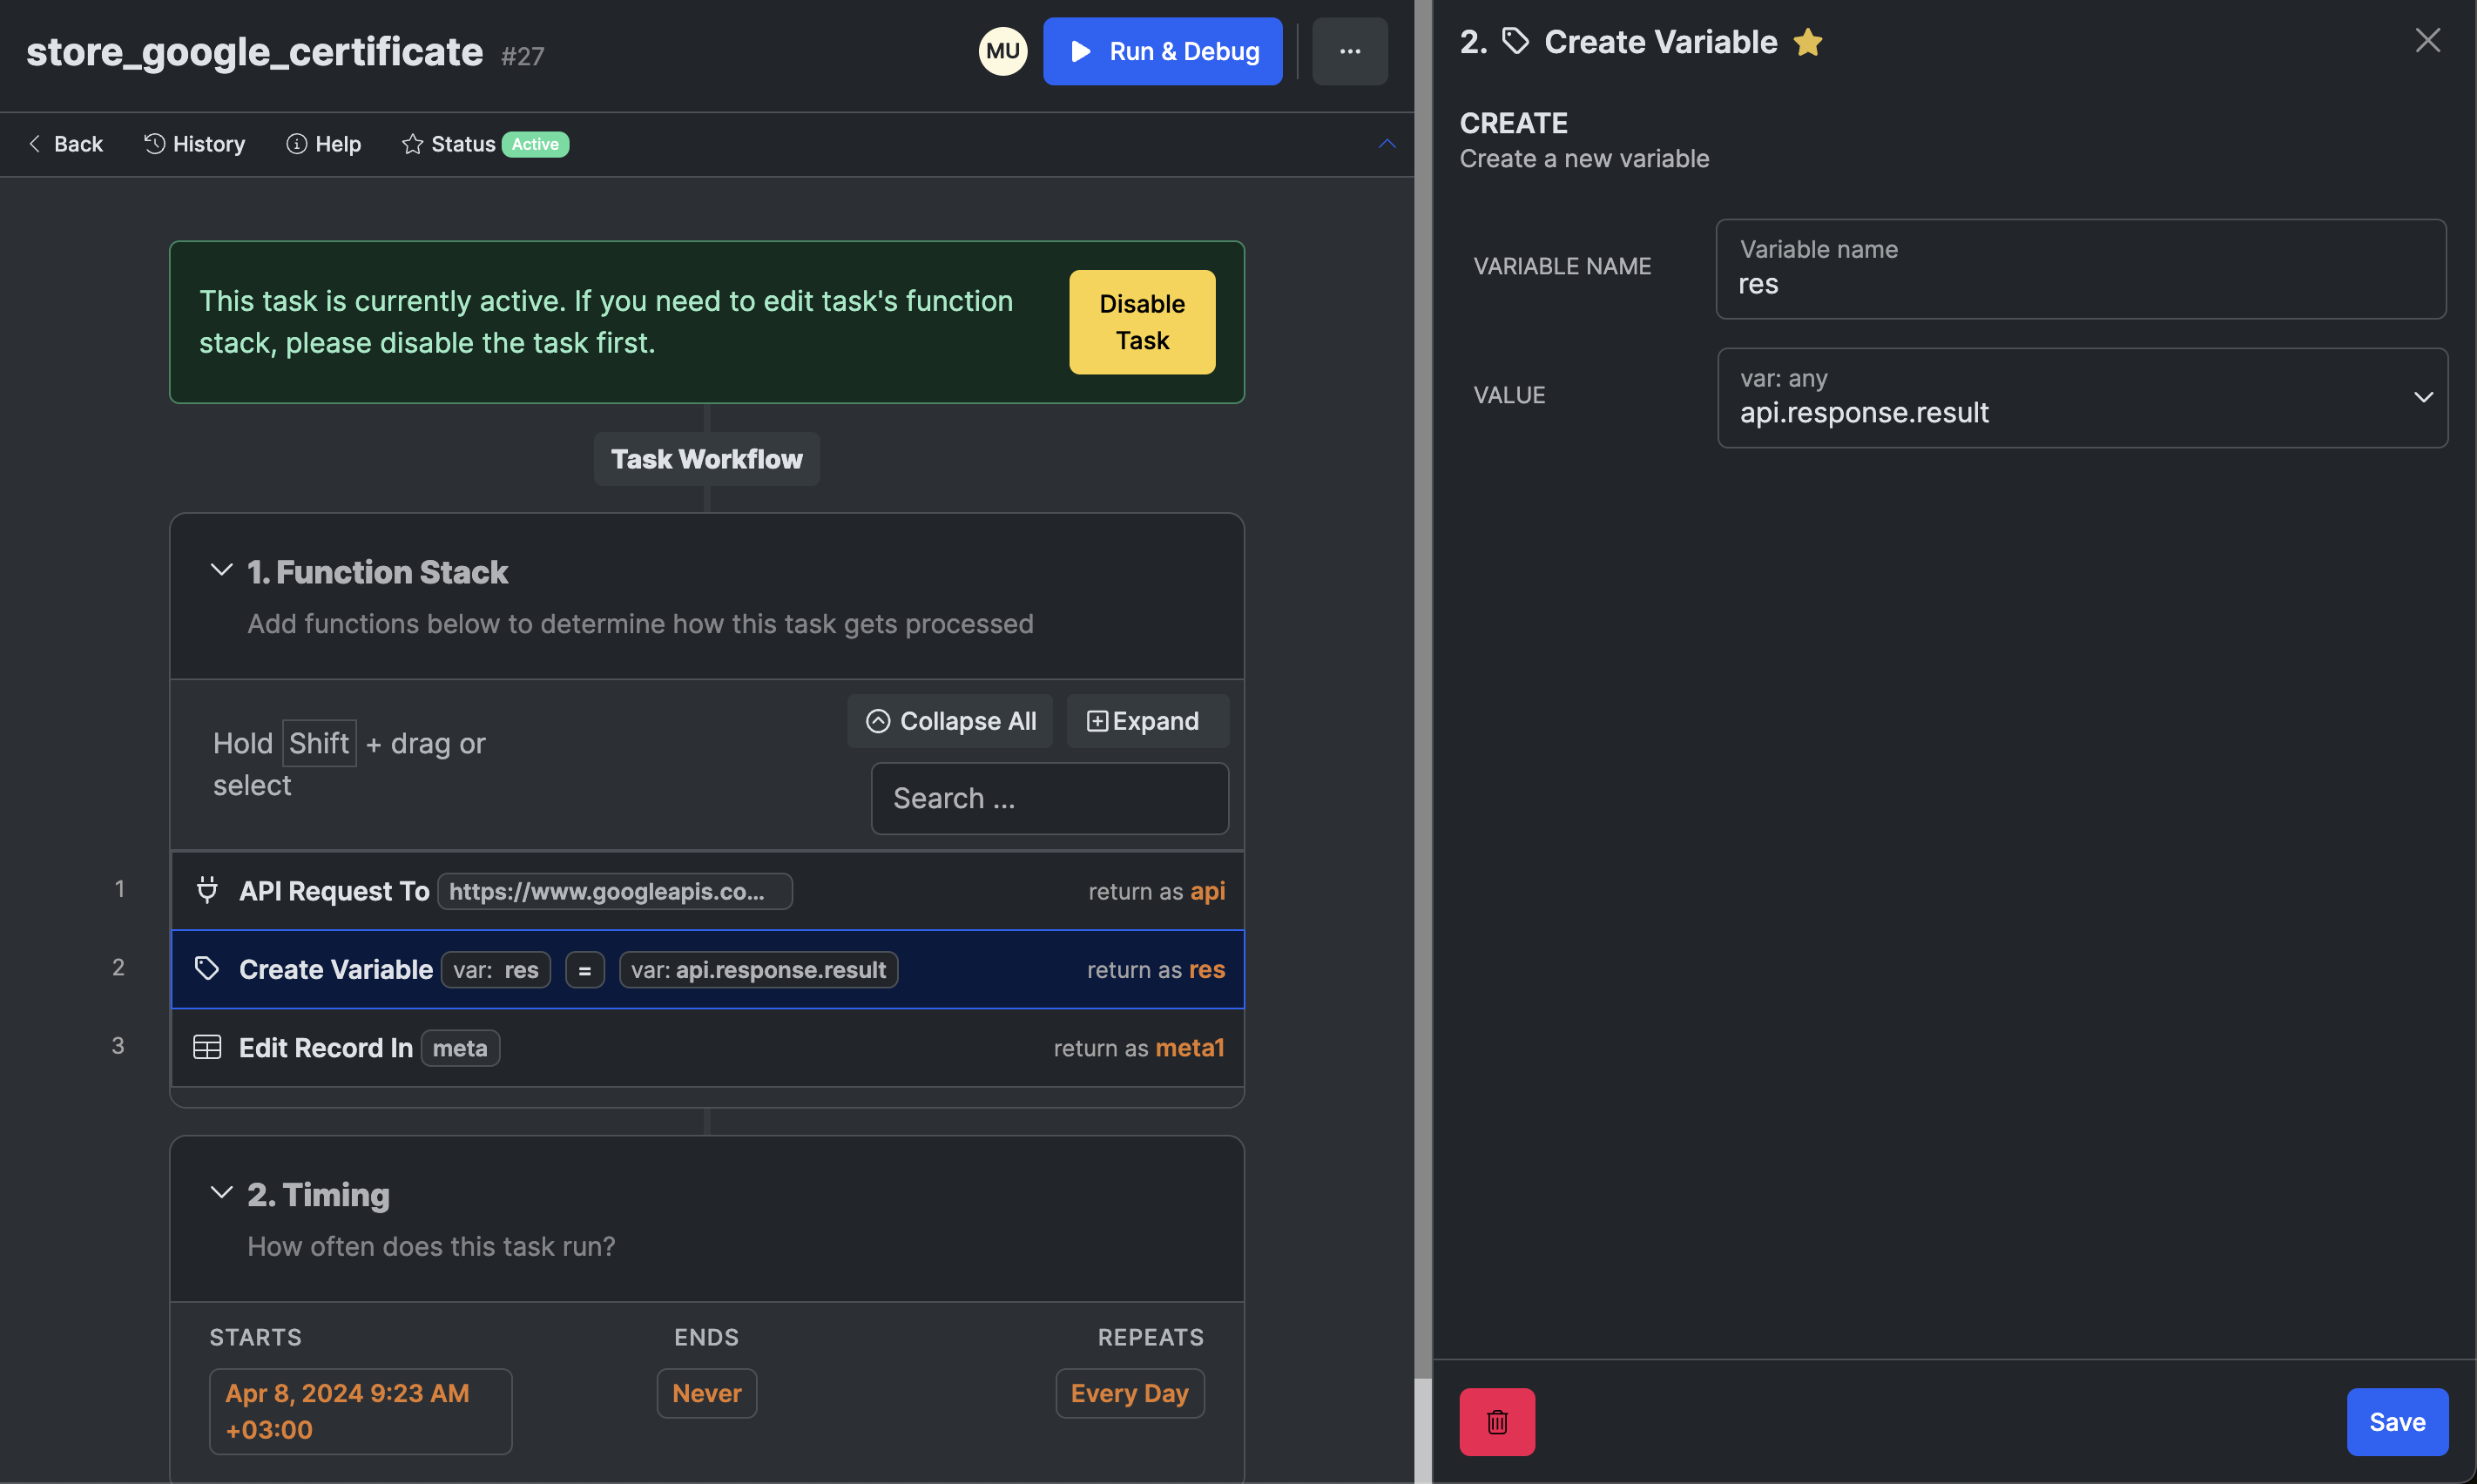
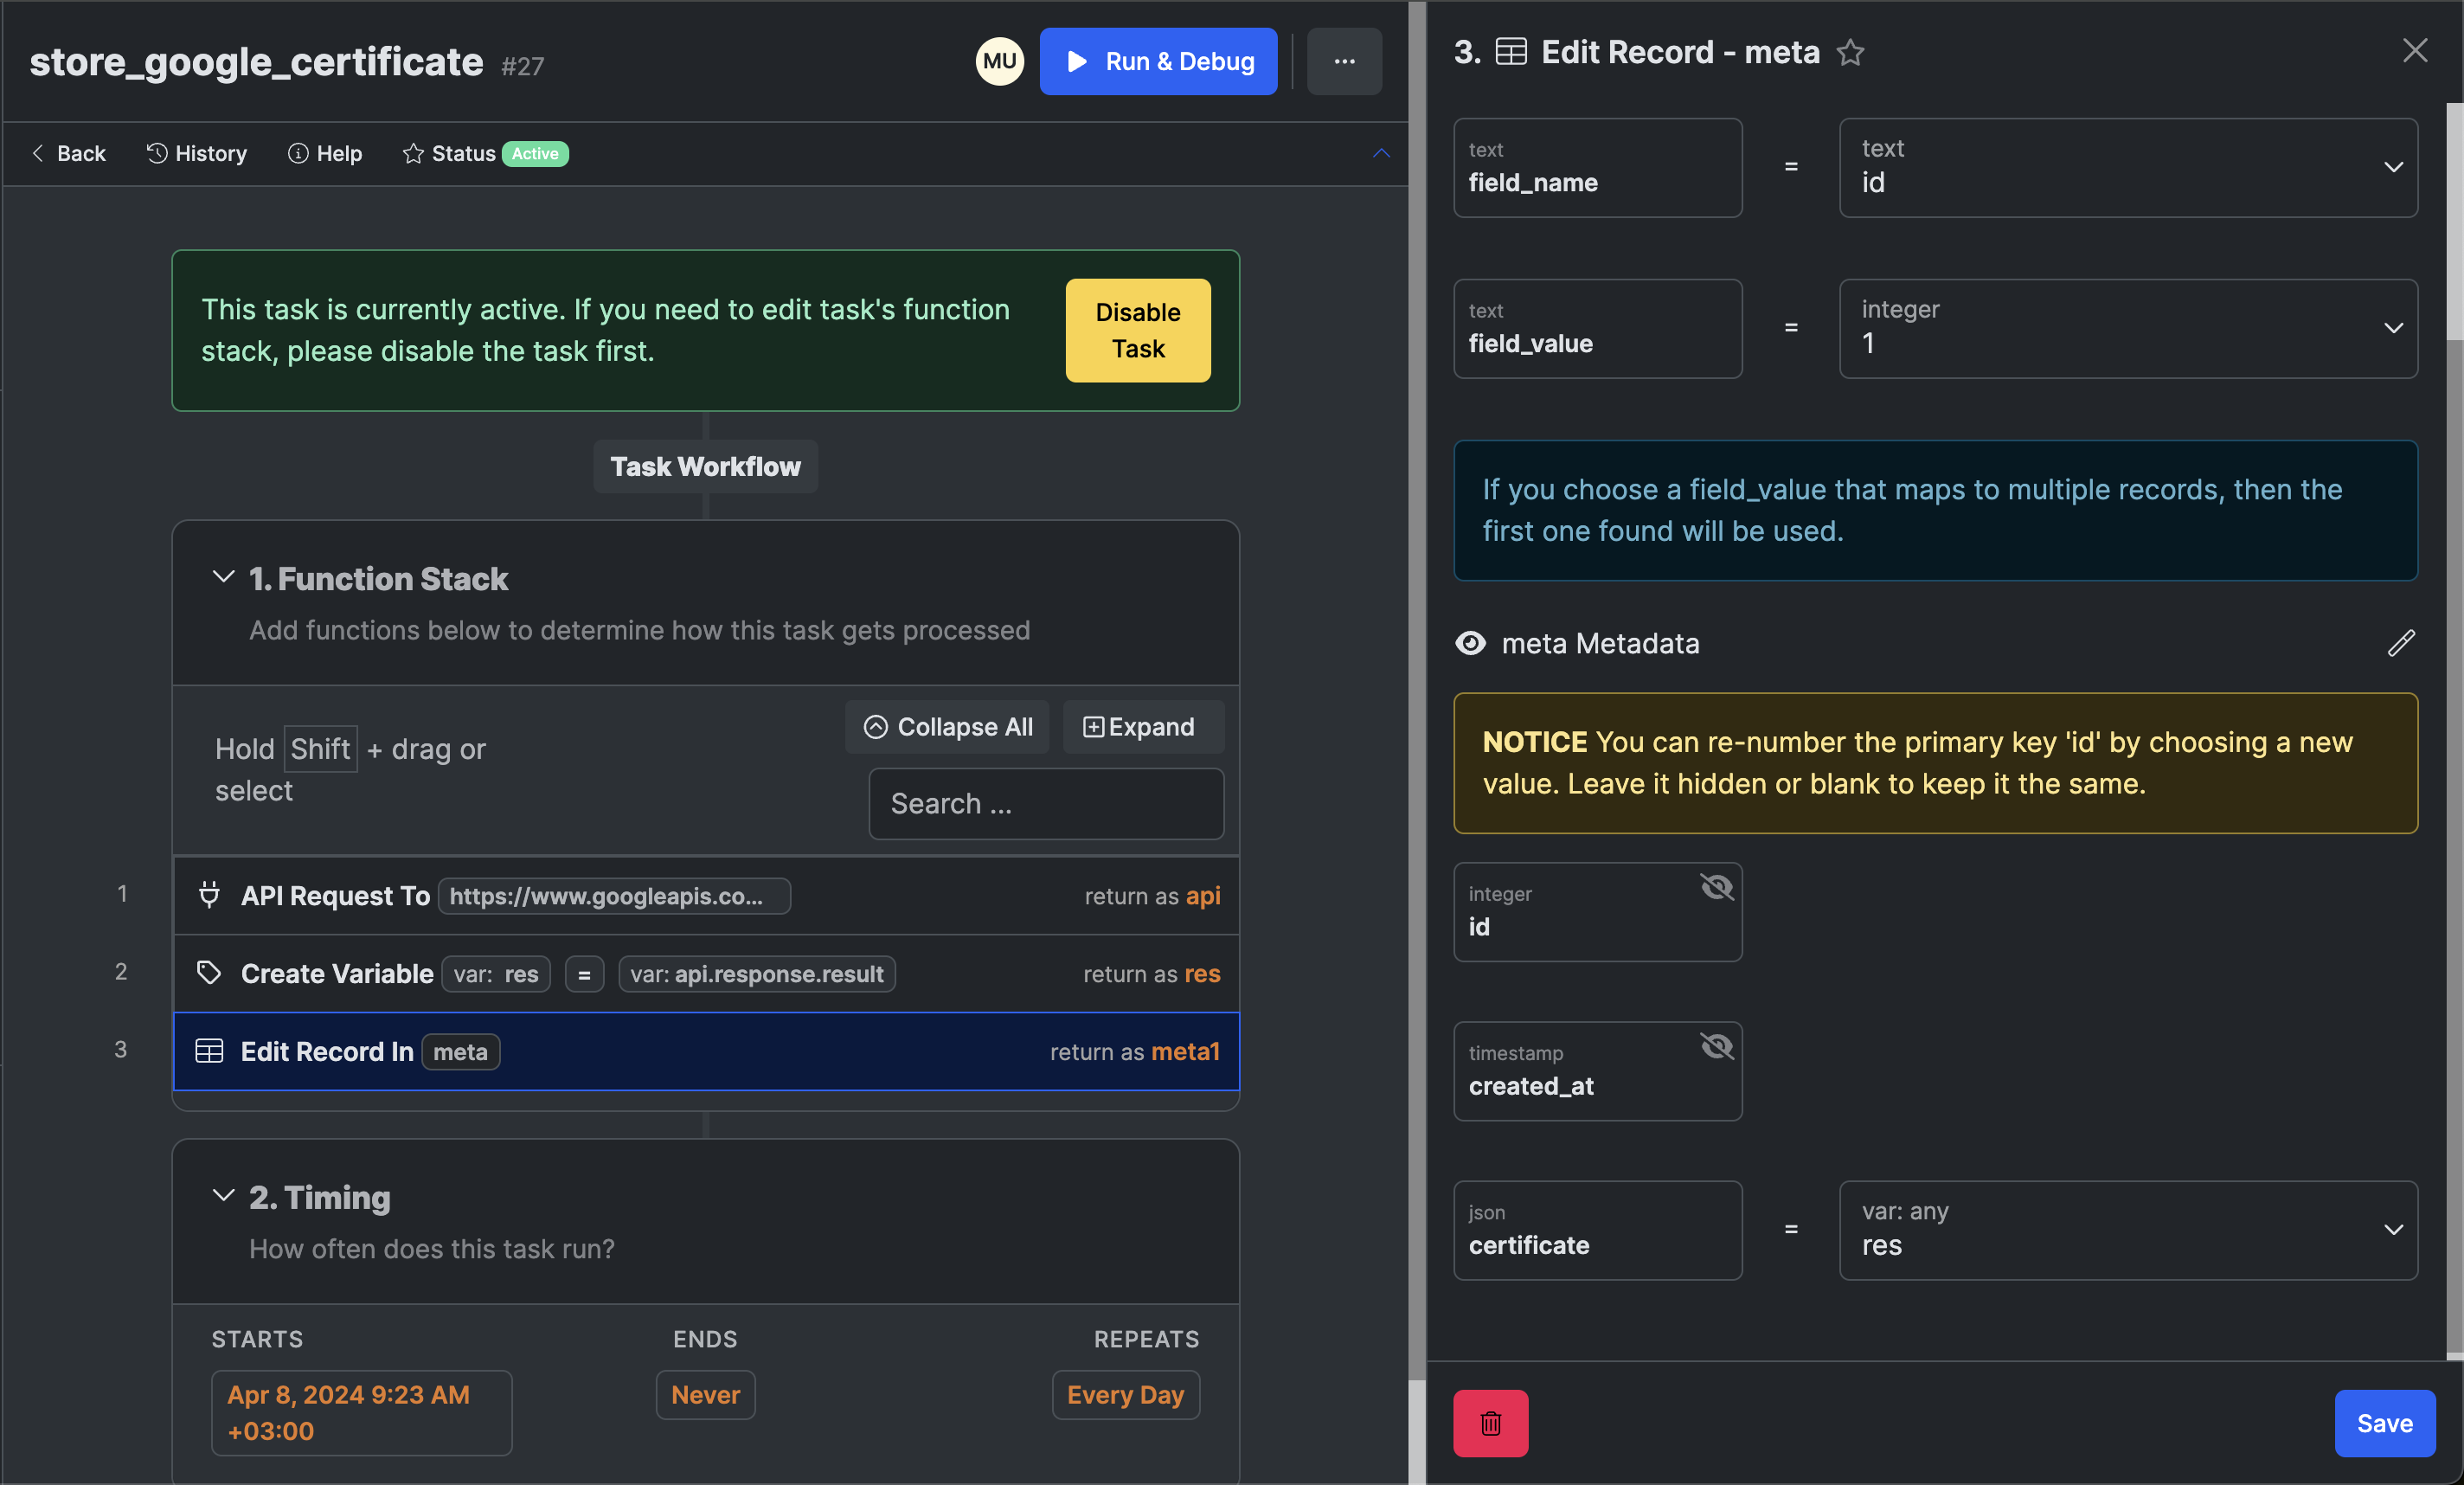
2. Create a task that runs daily, retrieves the latest Google certificate, and stores it to the database.
Fetch the following endpoint https://www.googleapis.com/robot/v1/metadata/x509/[email protected] to retrieve the Google certificate. This X.509 certificate is used to securely authenticate and establish communications between Google's cloud services. We will use it to decode the token coming from Firebase.
.png)
.png)
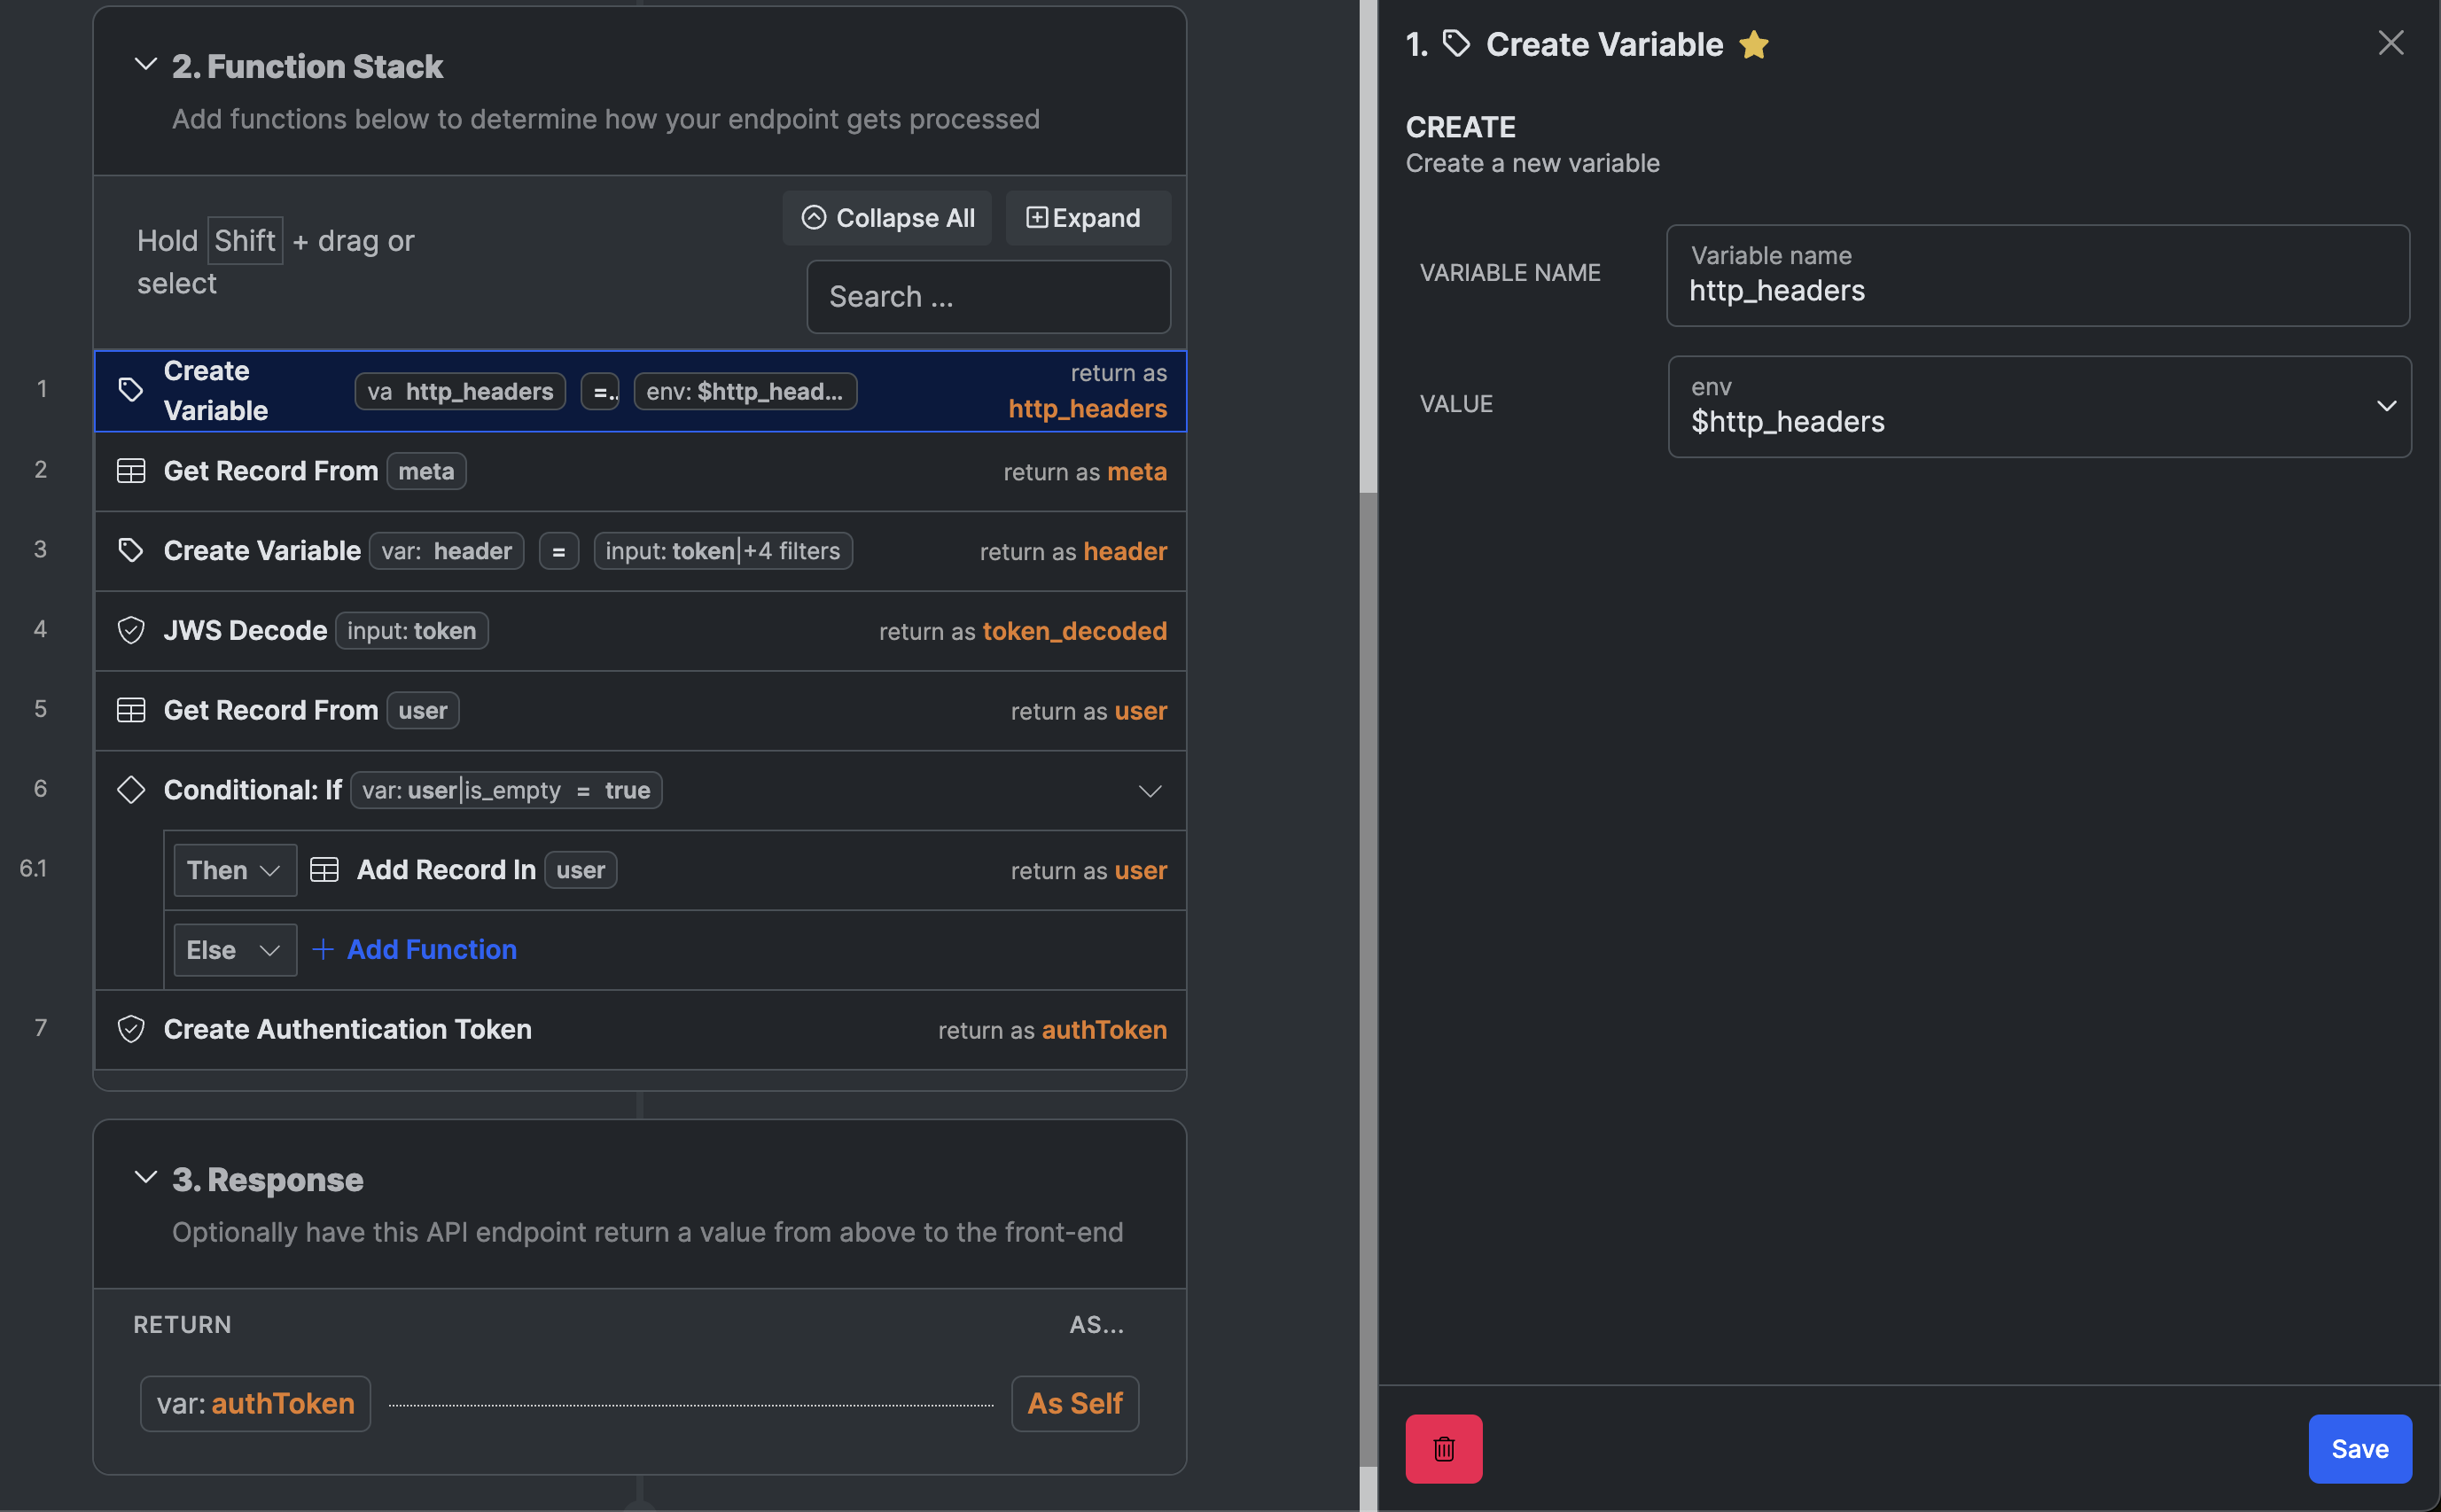
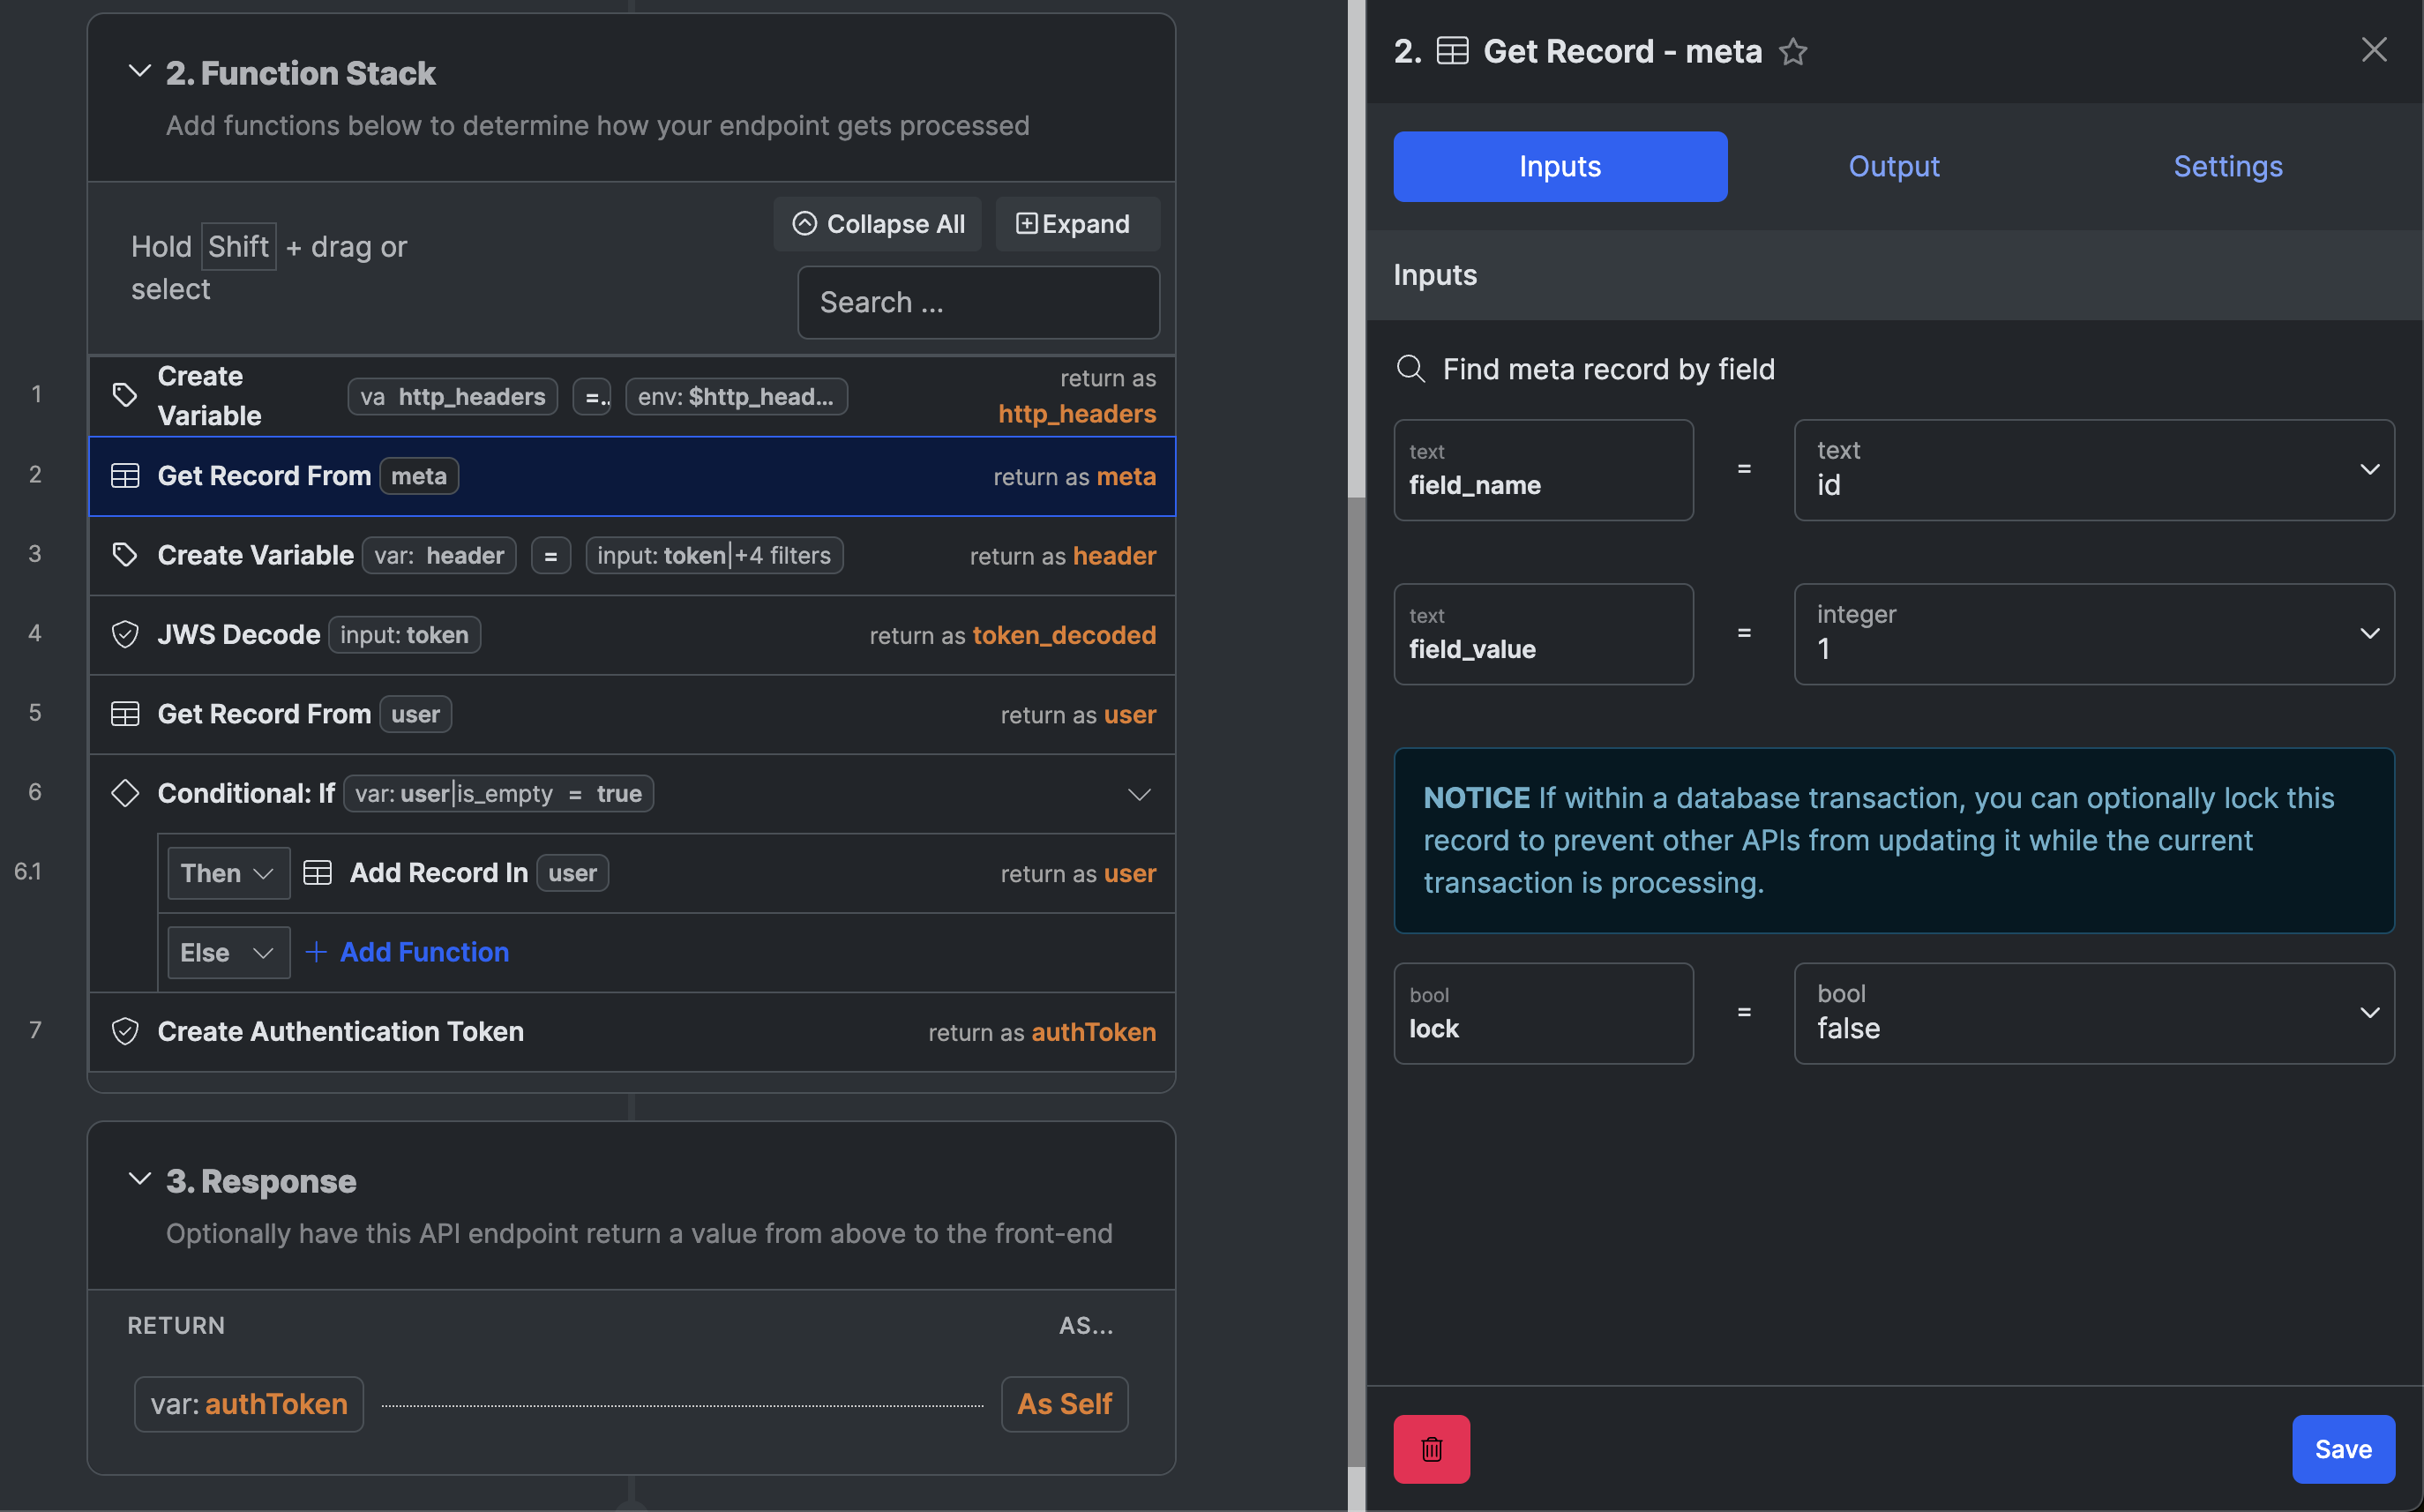
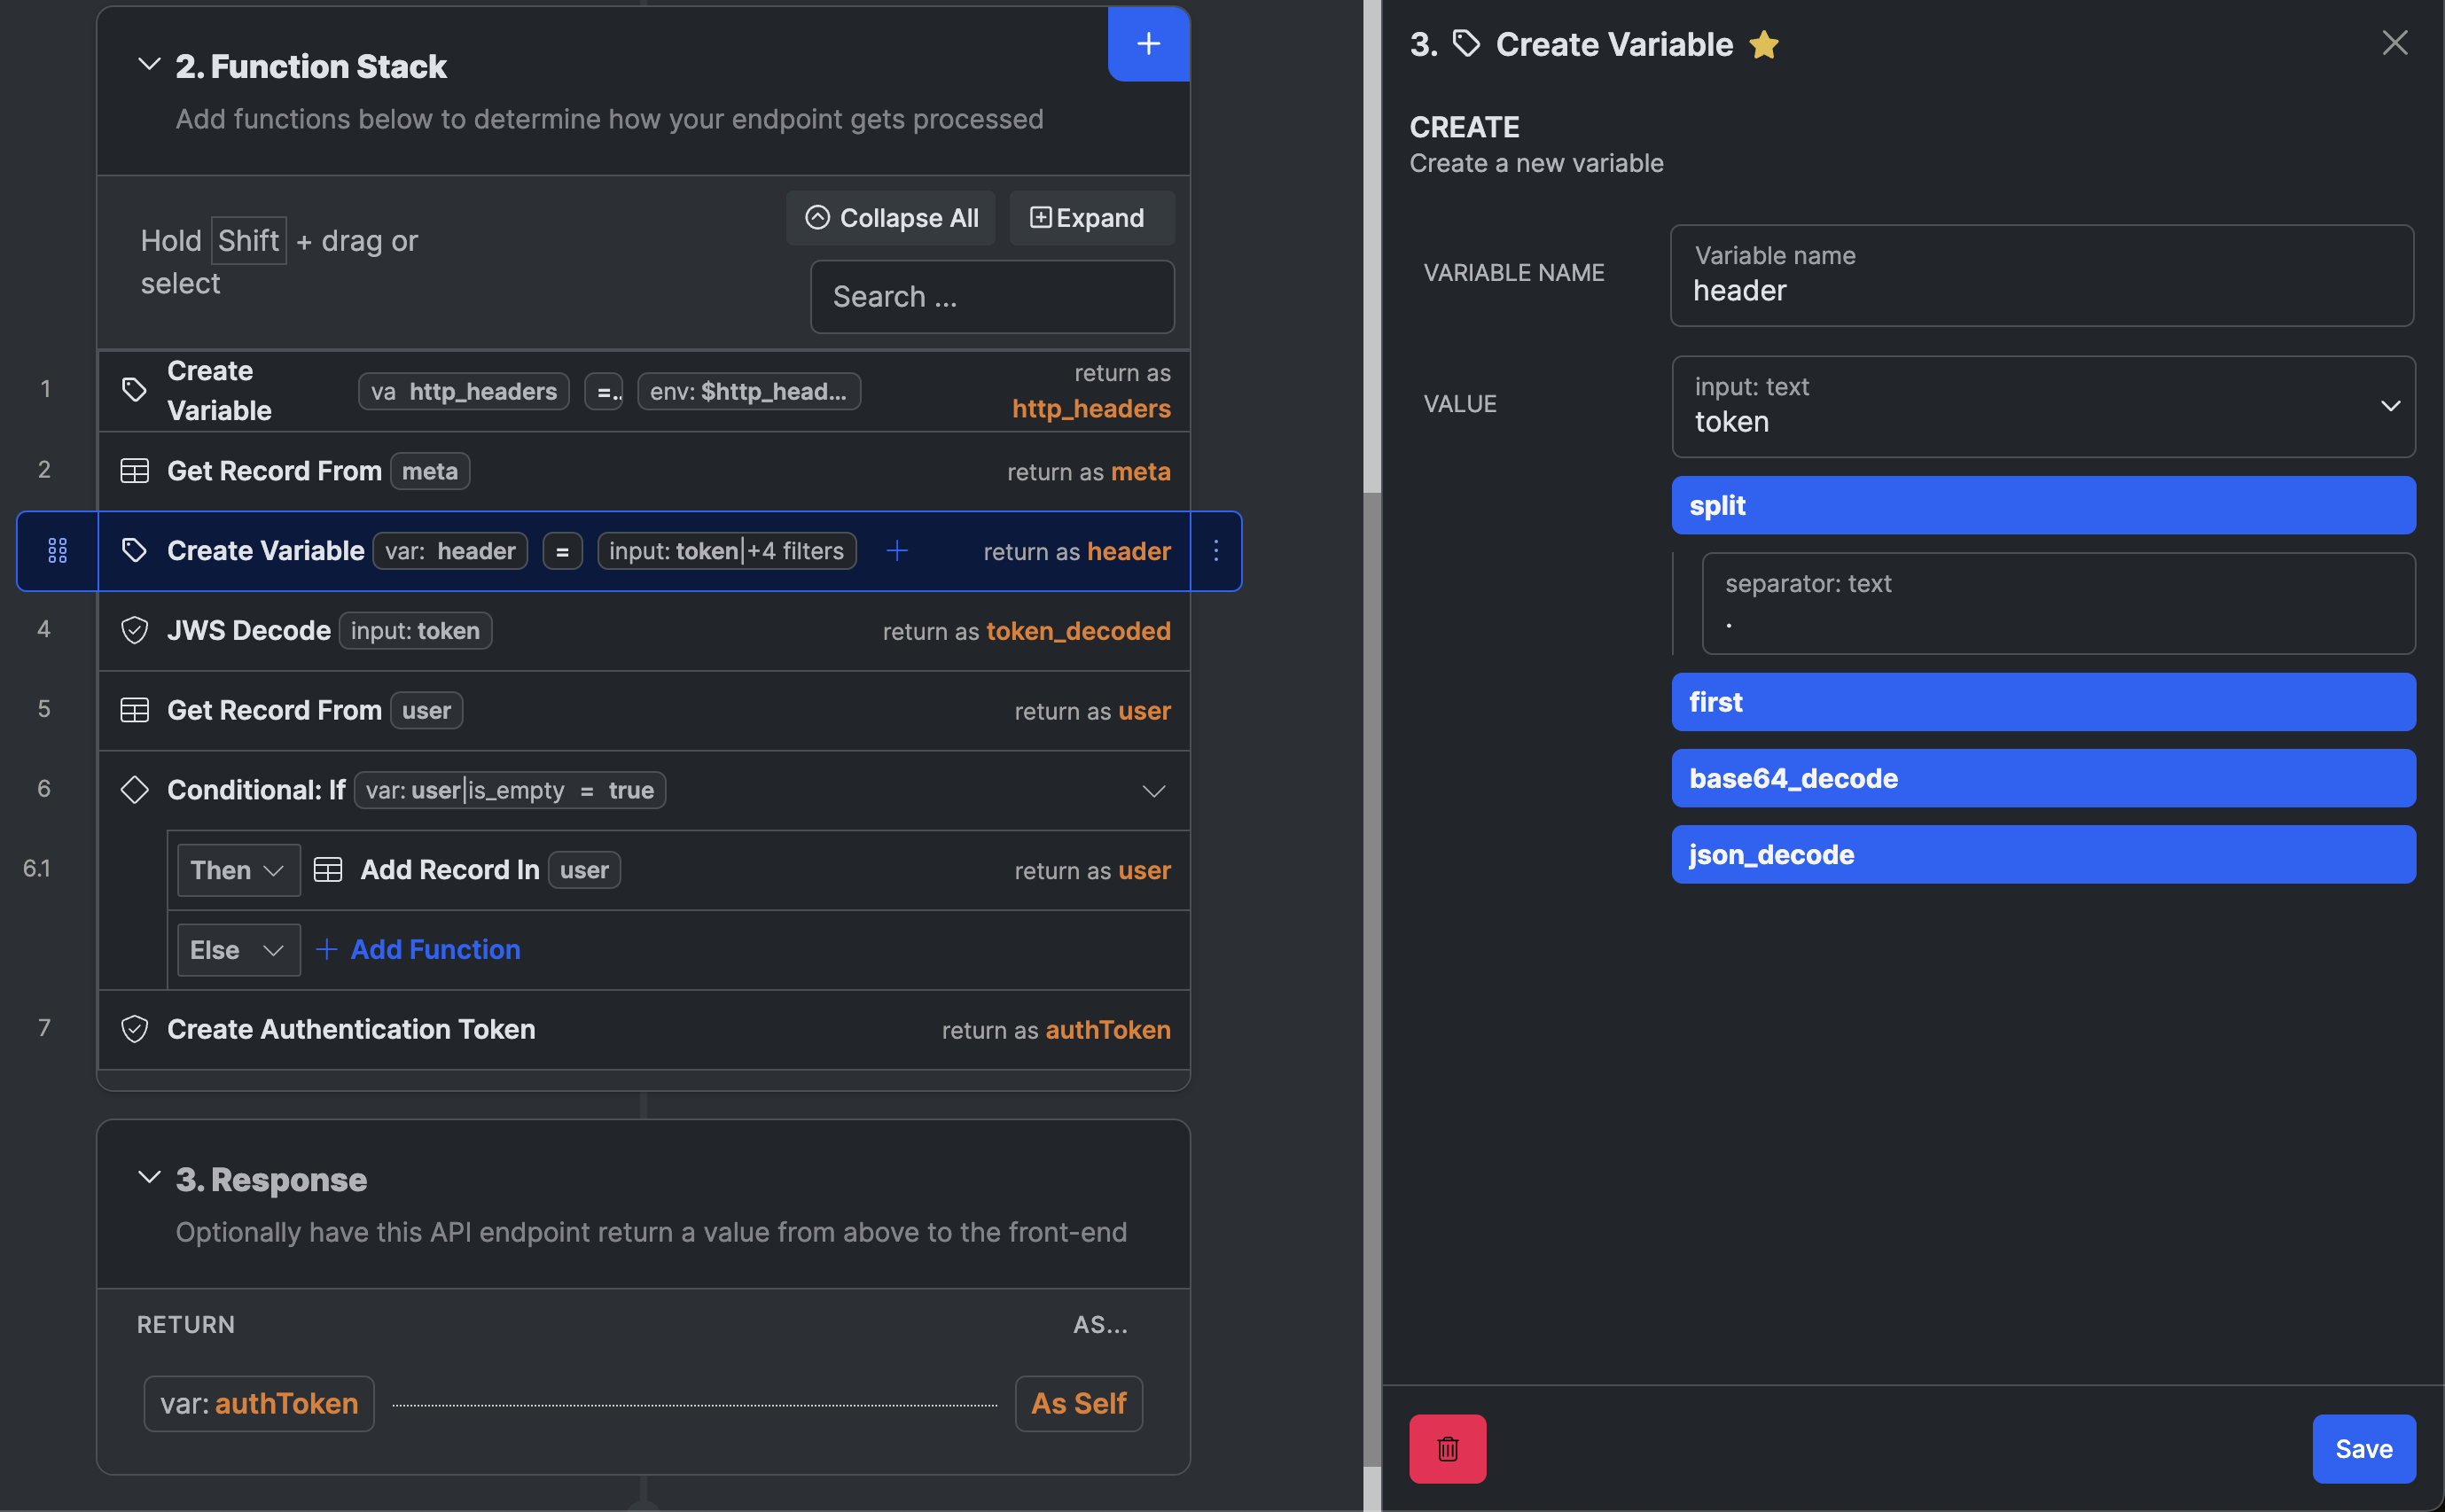
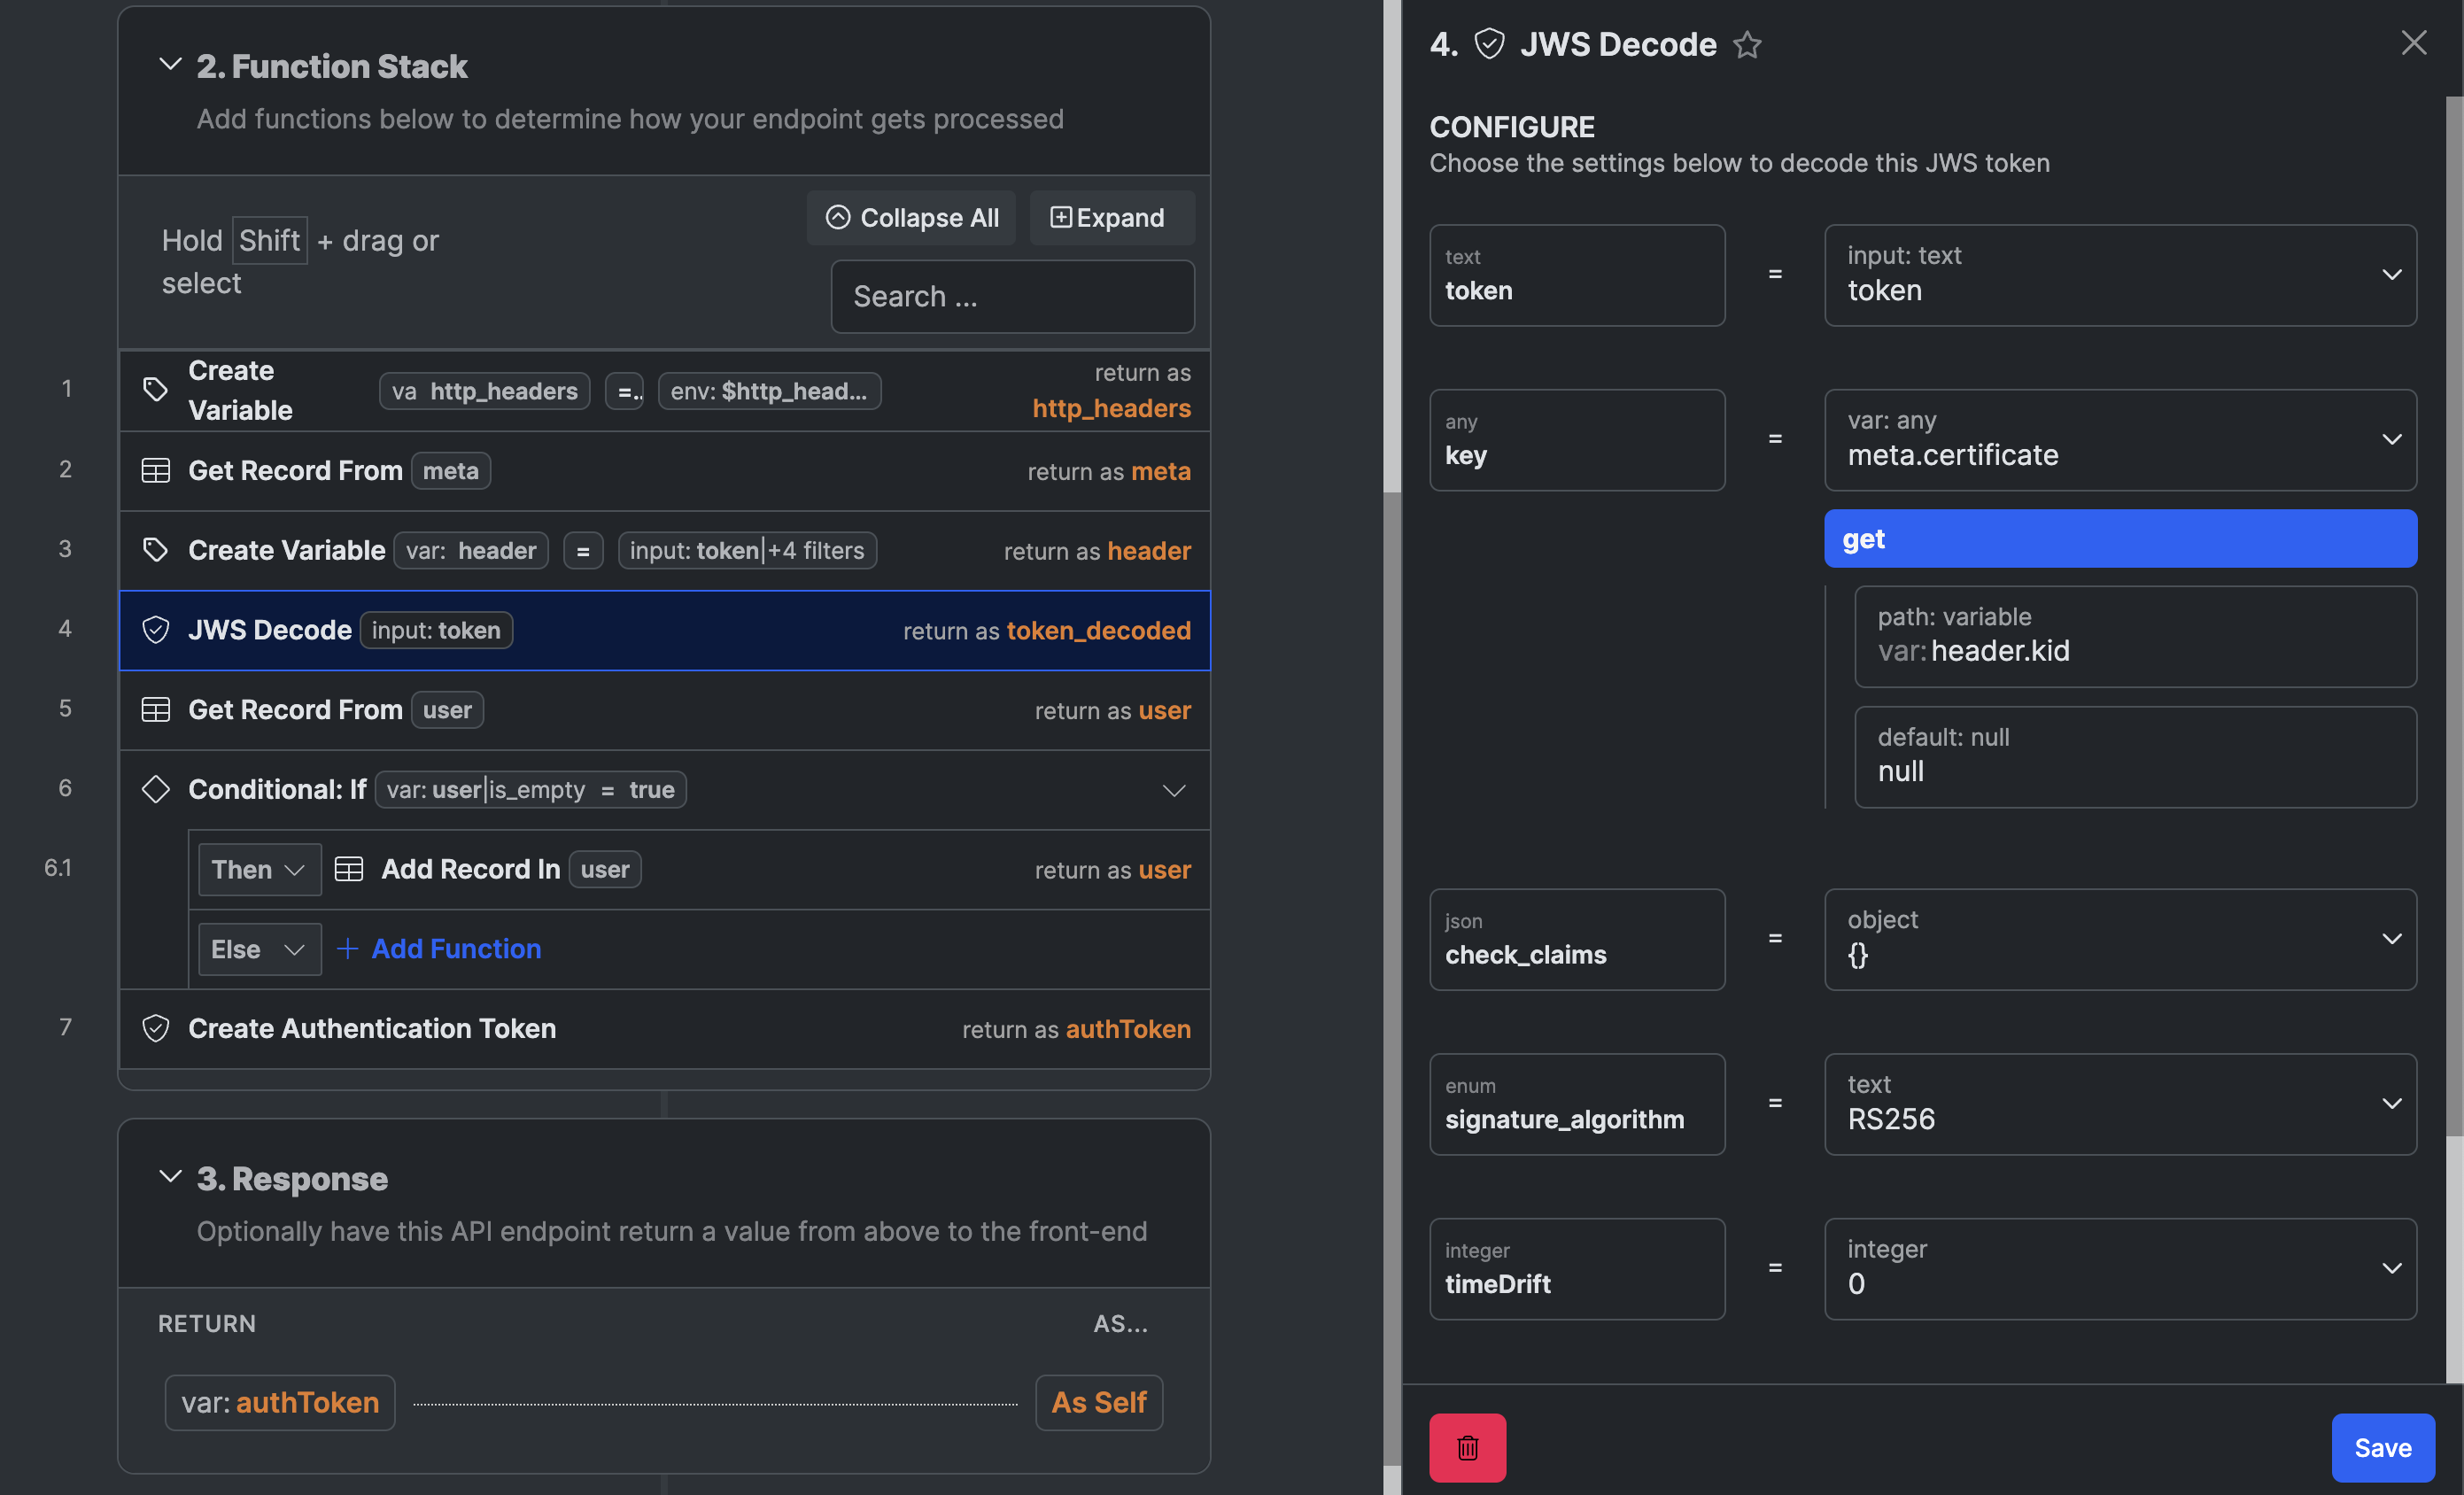
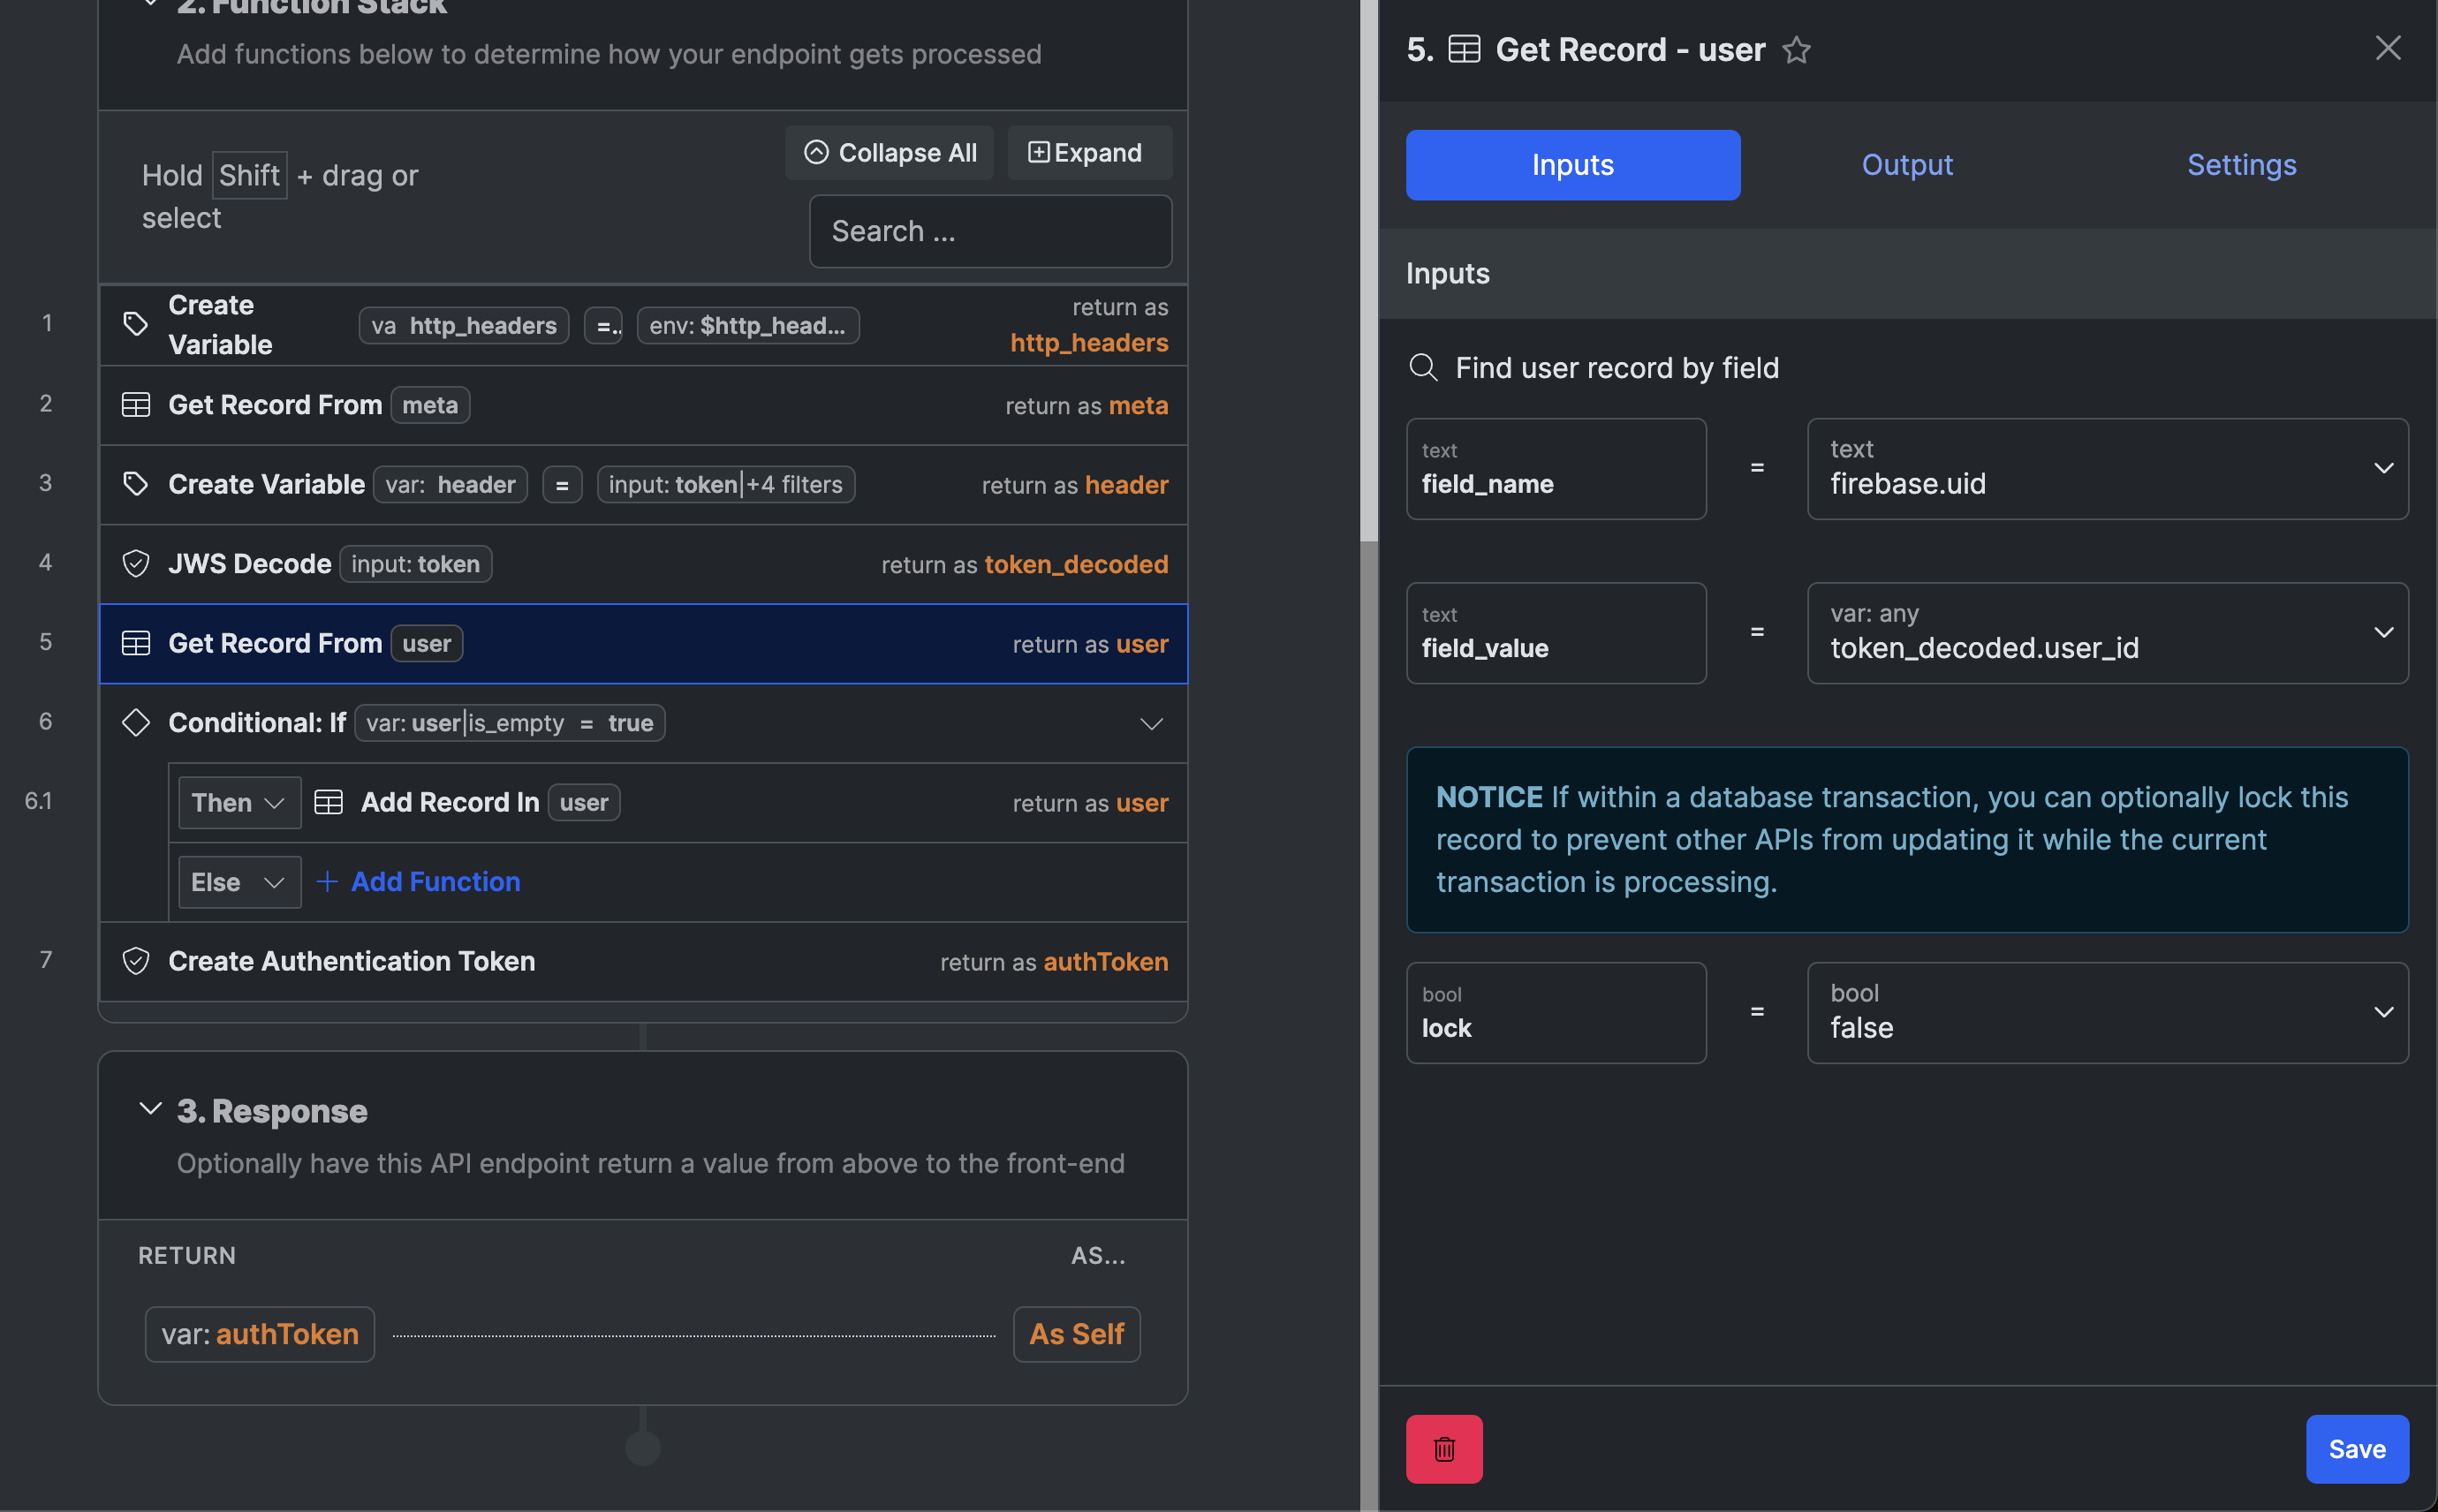
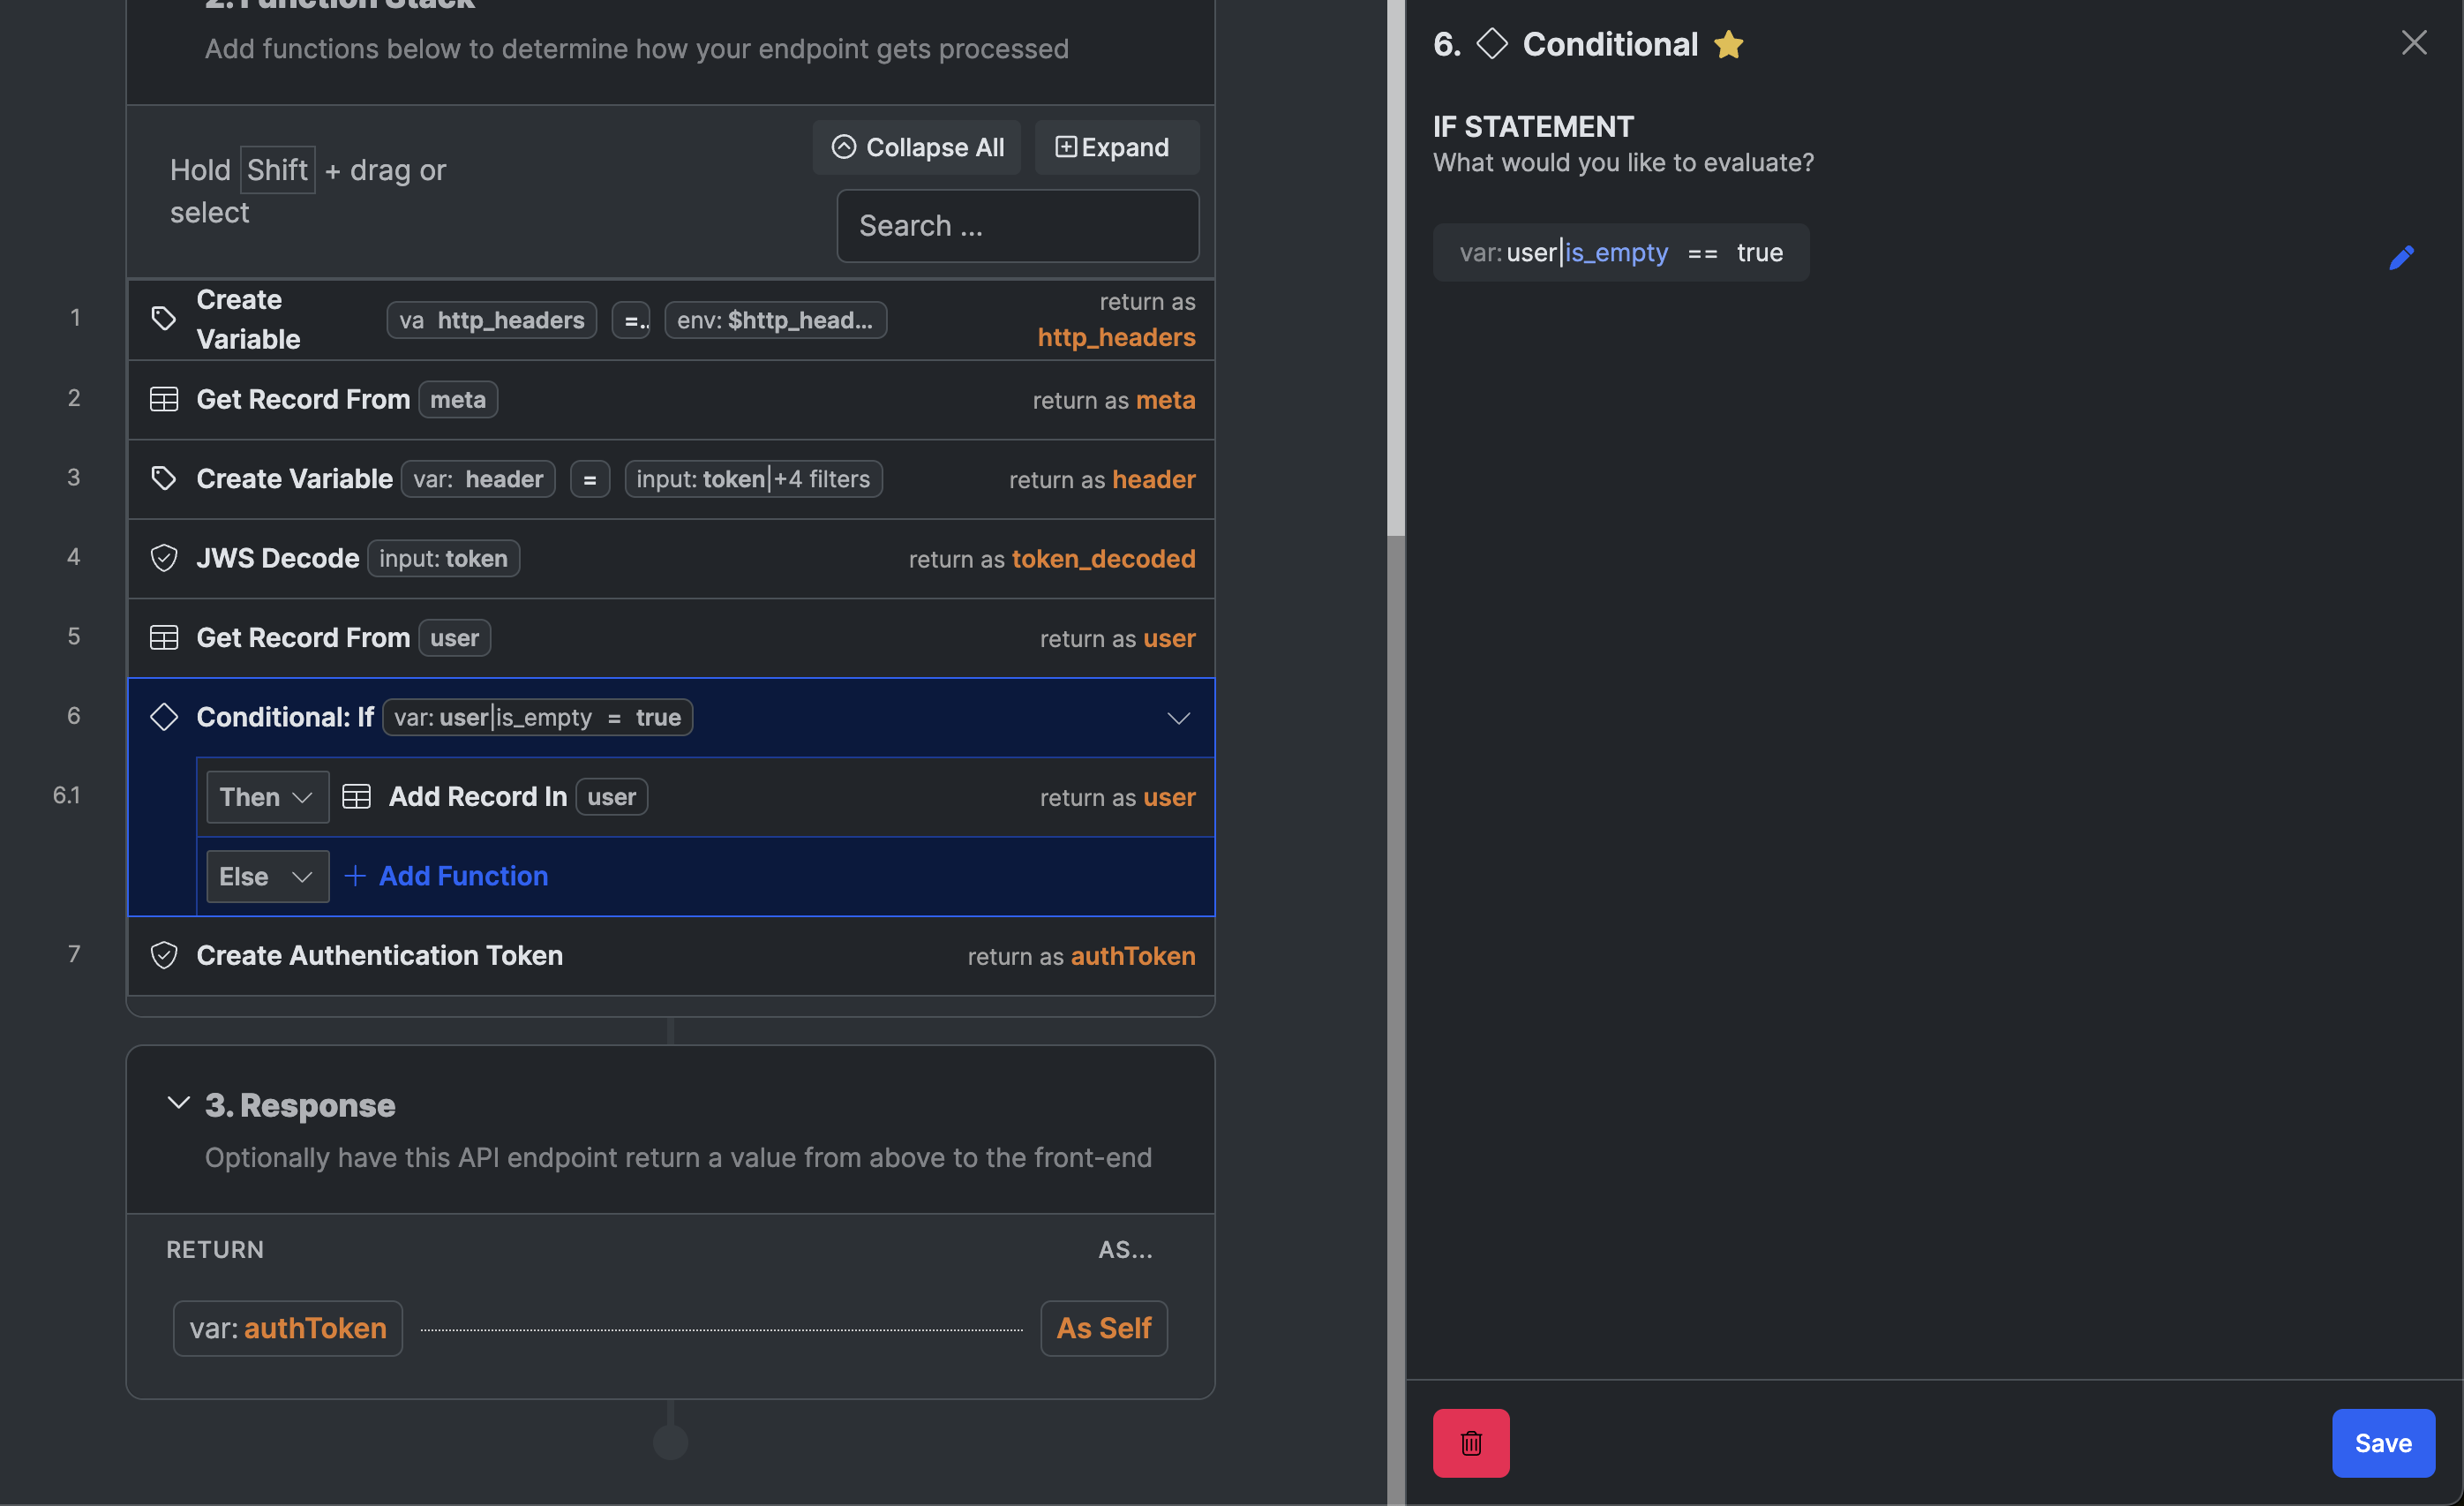
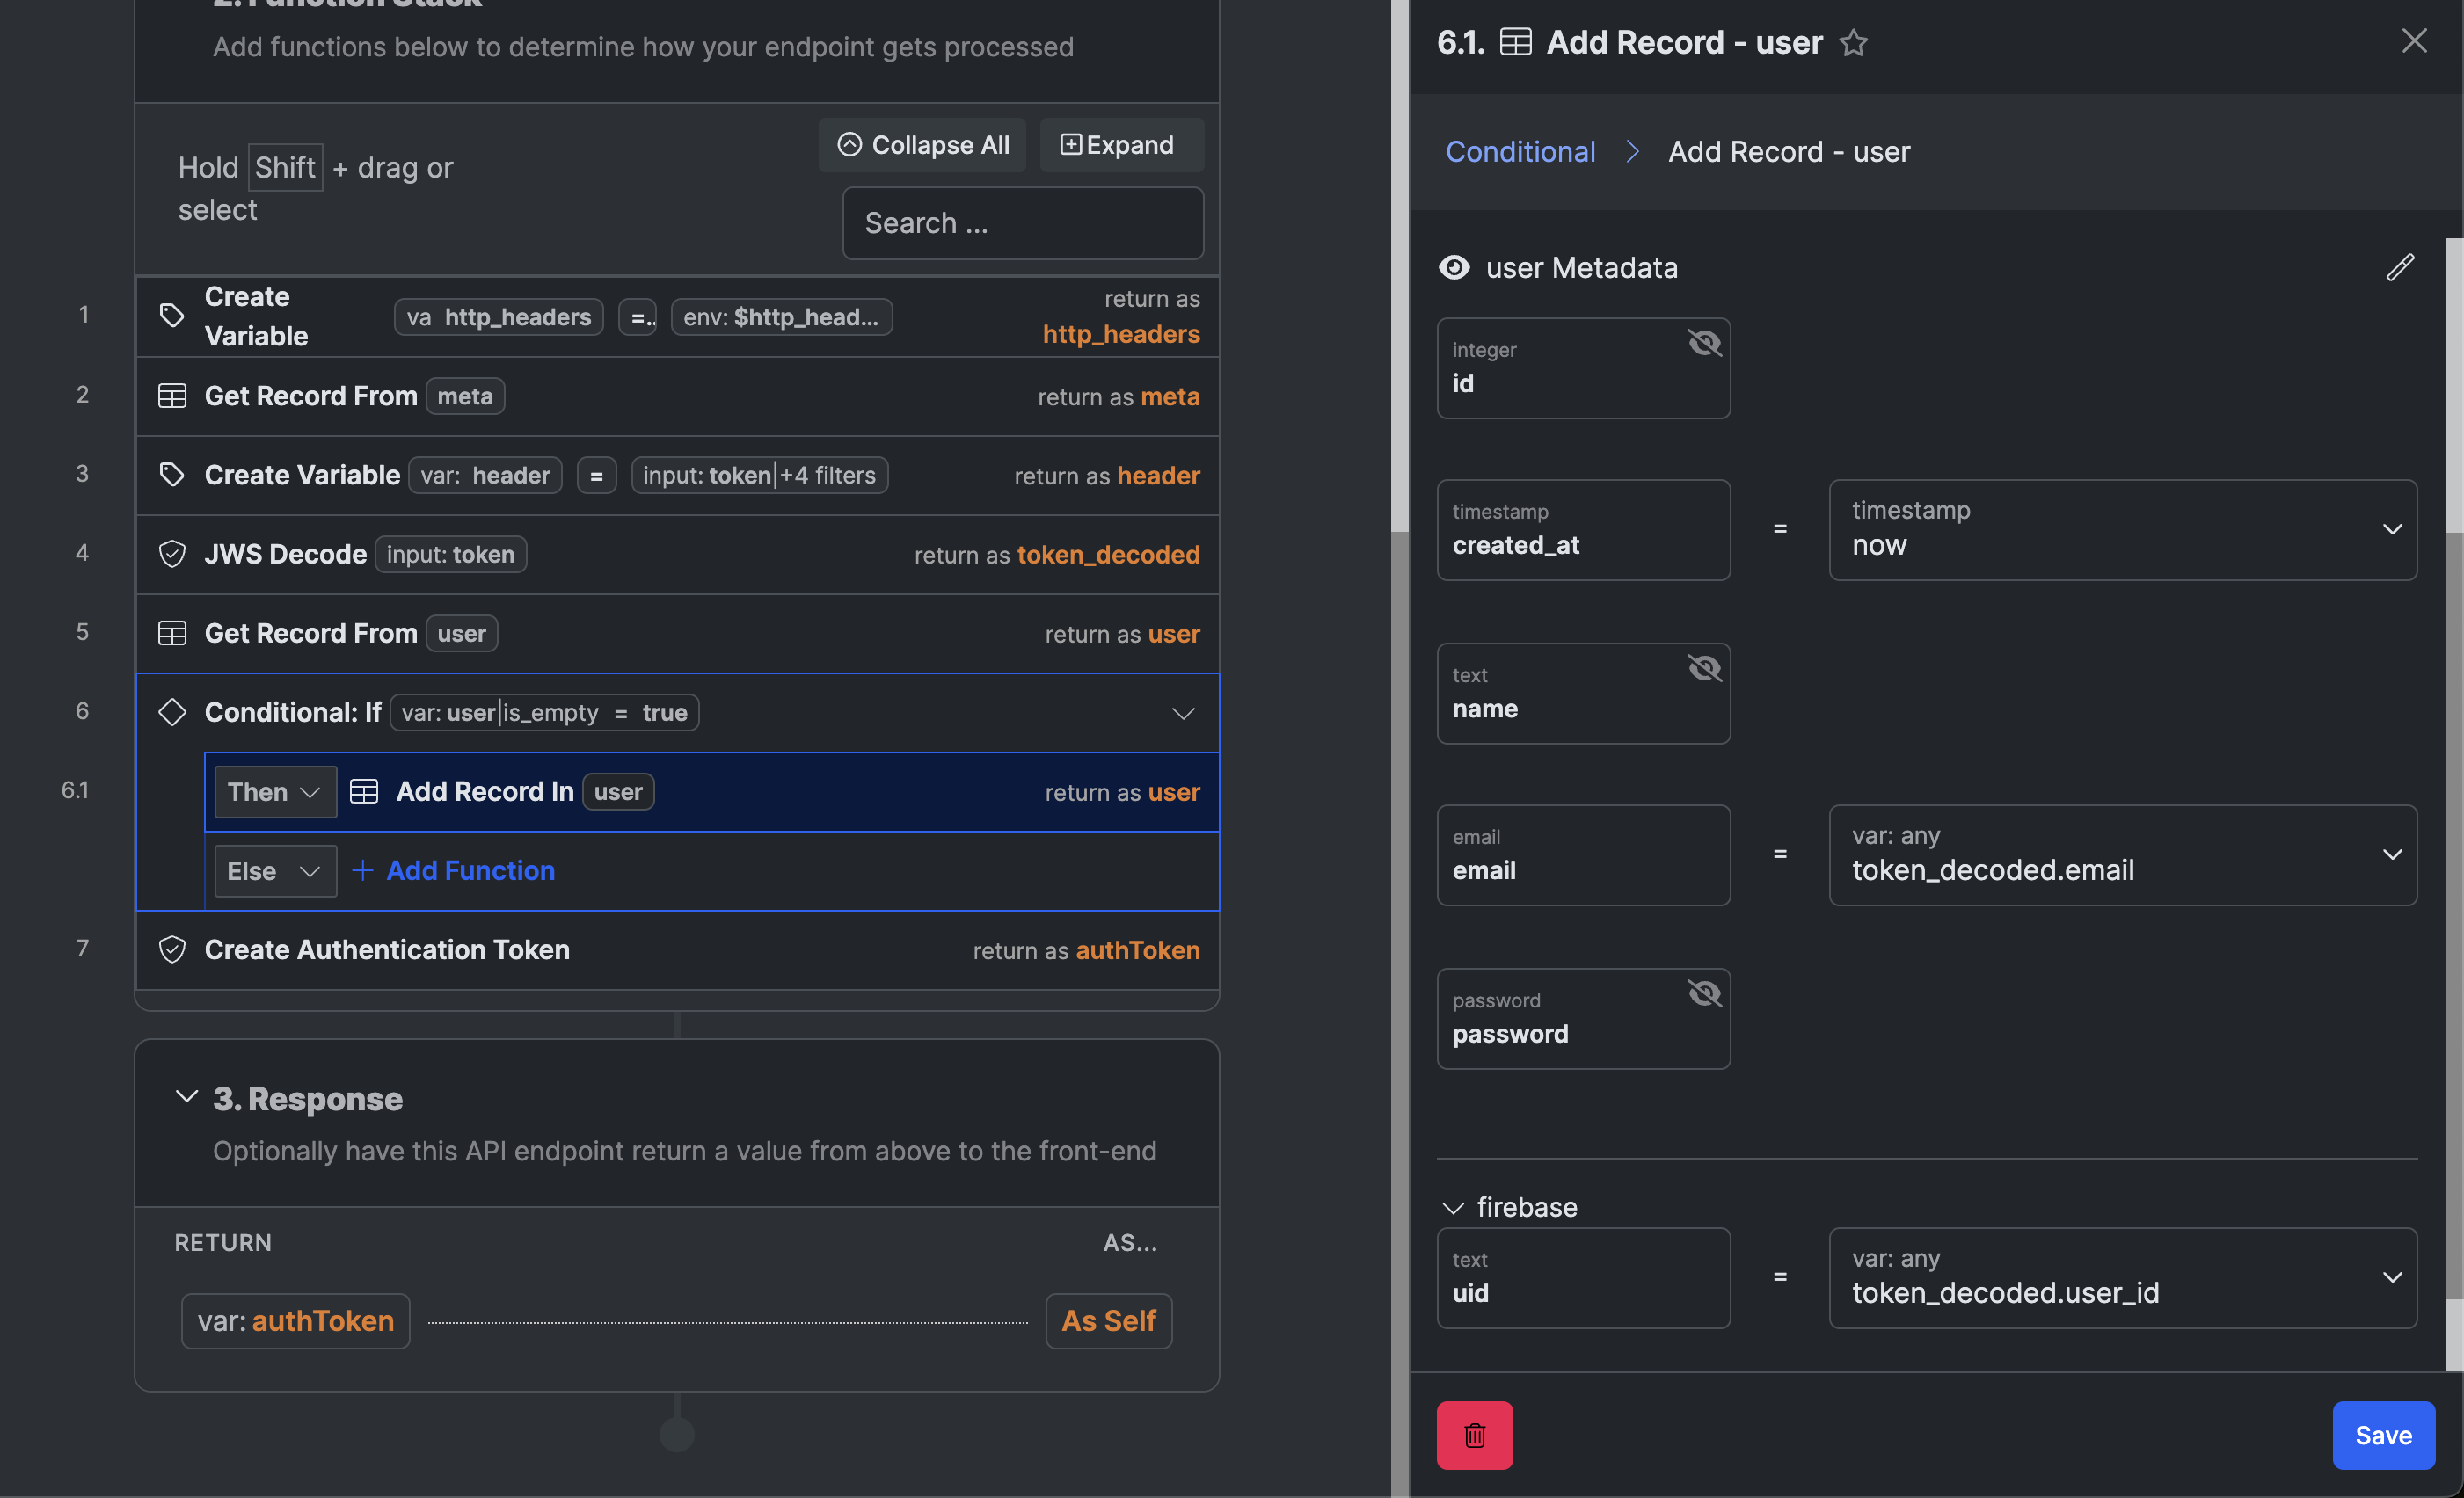
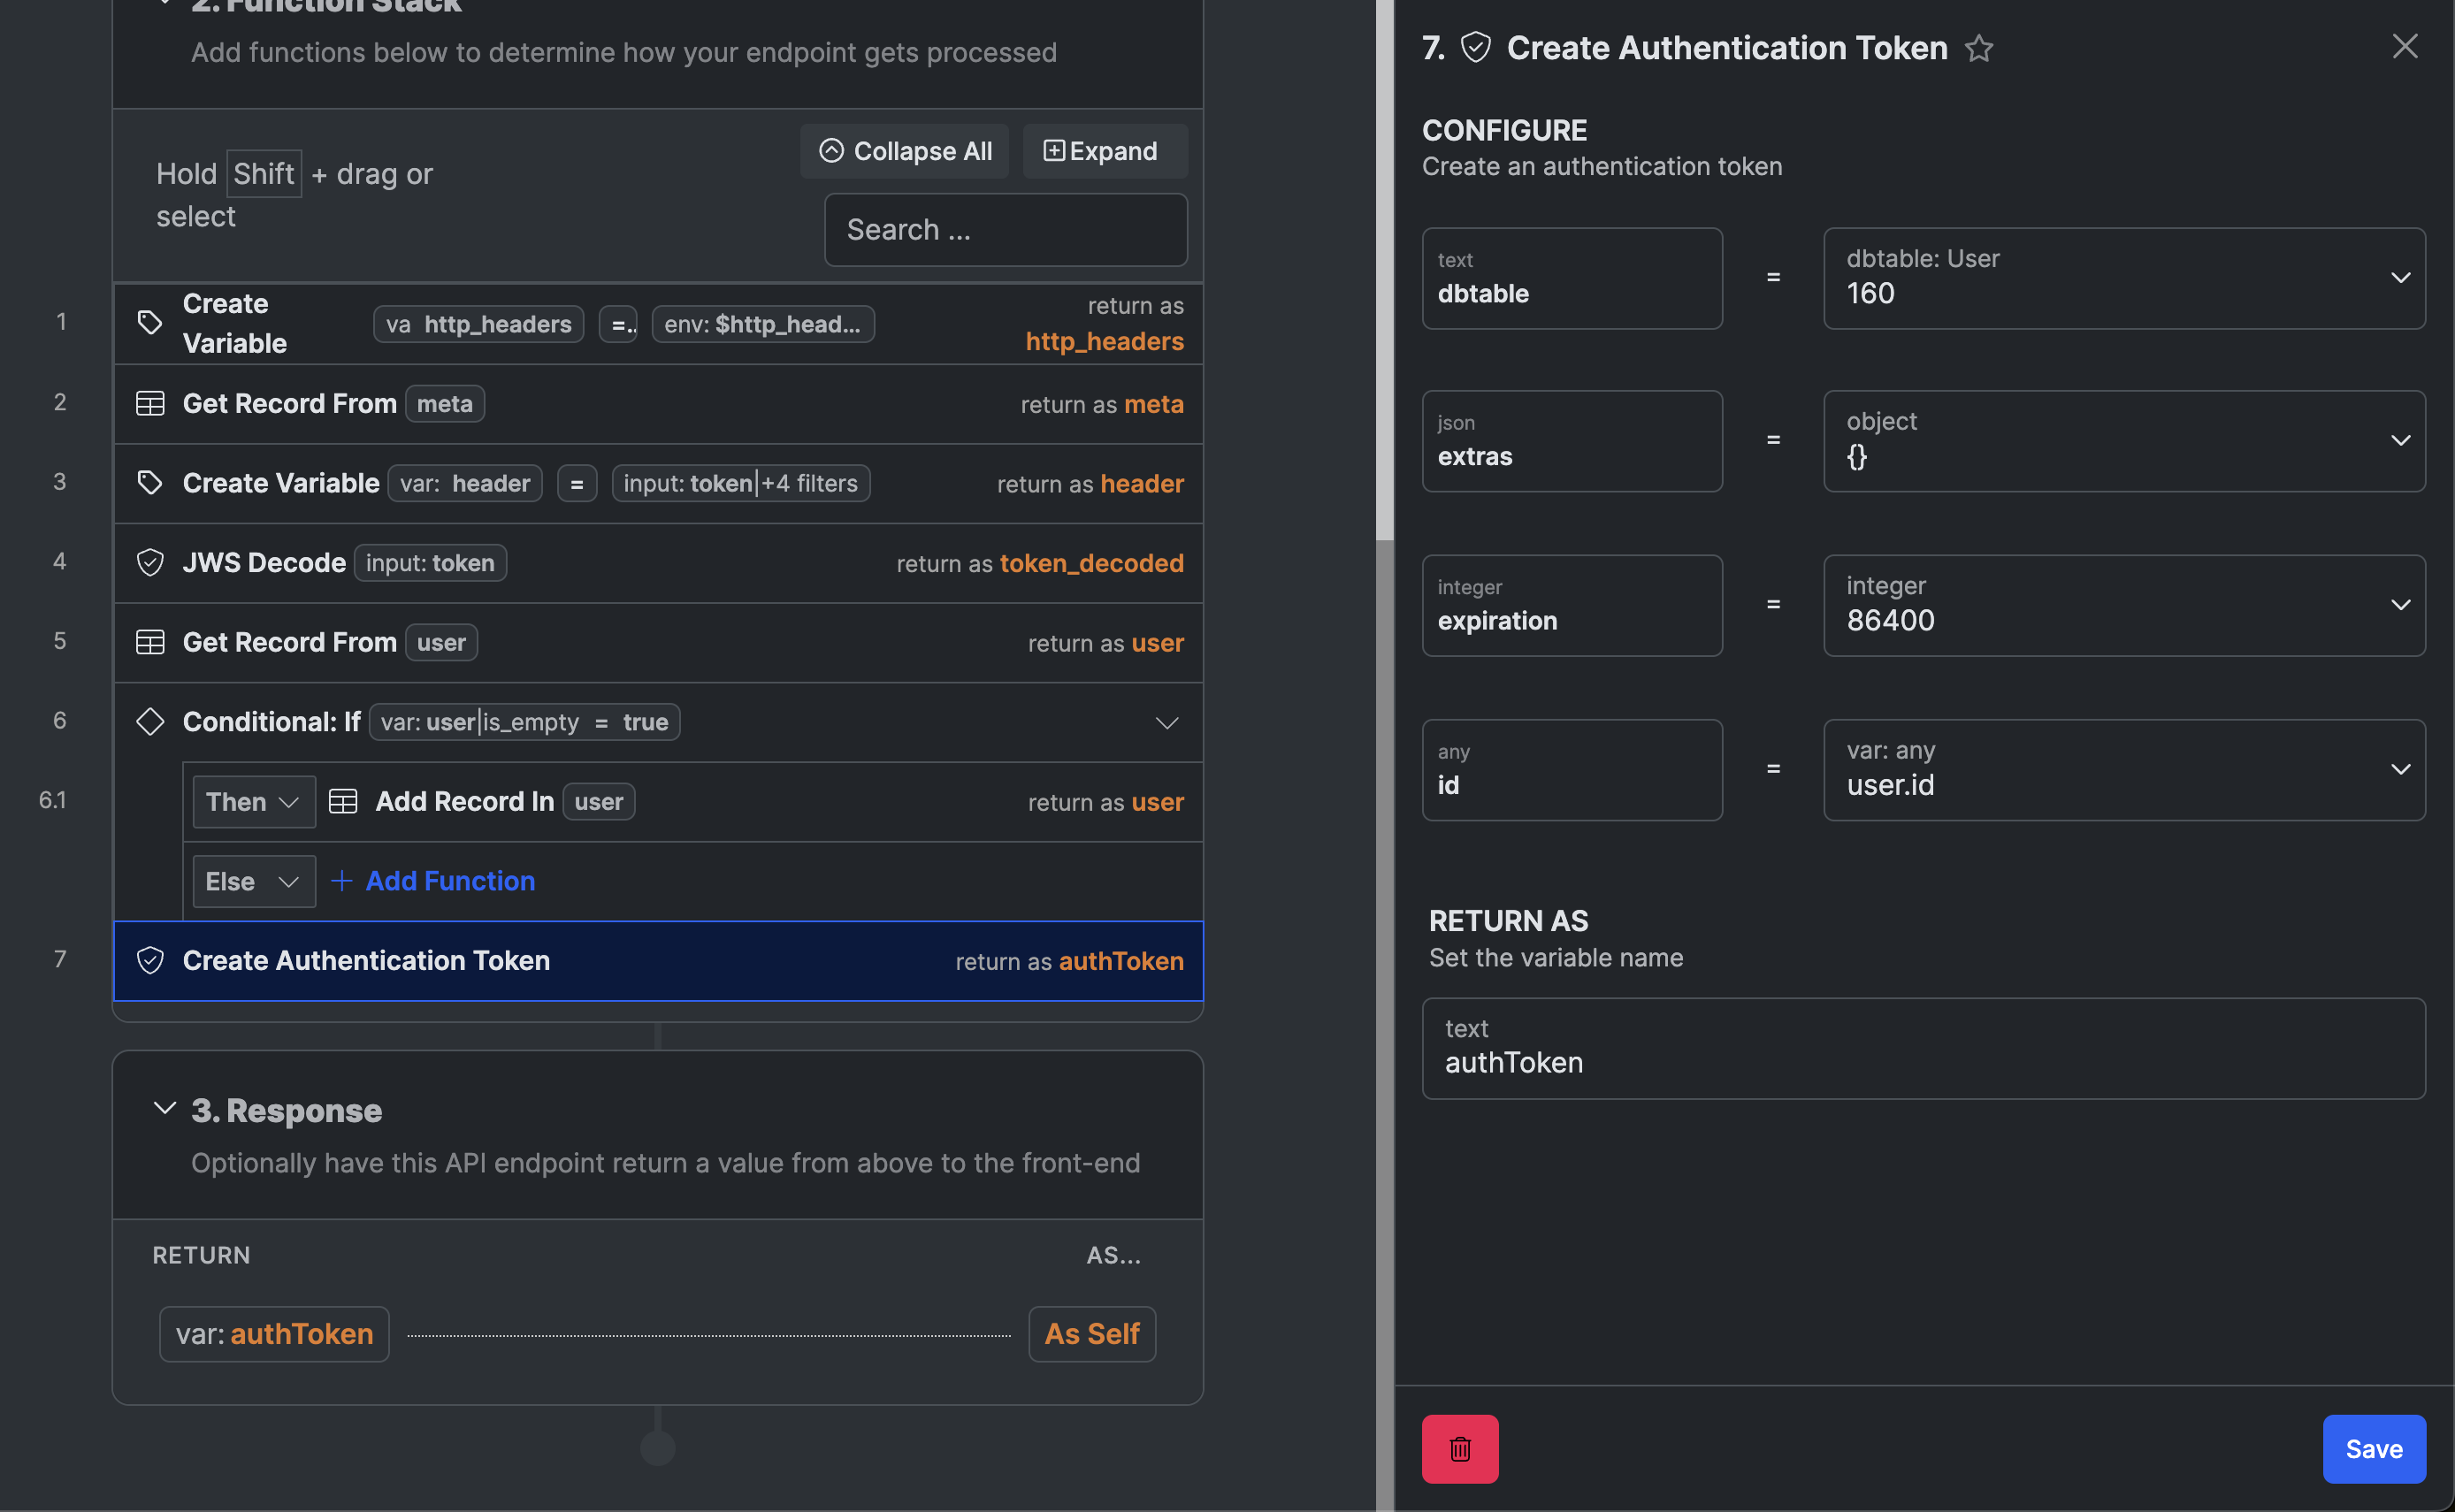
3. Create an endpoint which receives the Firebase token and exchanges it for a Xano token
This logic creates a user if it doesn't already exists in the database or just returns the auth token if the user already exists.
Create a Firebase folder to keep this organized.
.png)
.png)

In Webflow
1. Create the login form
.png)
.png)
.png)
.png)
.png)
- Add a wized attribute to it so we can target it later.
- Give the inputs clear names
- Add attributes to the auth options as well.
- As Wized doesn't currently support other options than Google, we will need to create some custom logic for other providers than Google.
.png)
- Add a login error
Hide it using CSS, from the global site settings.
.png)
2. Create the sign up form
.png)
.png)
.png)
.png)
.png)
- Give it Wized attributes
- Add clear naming on inputs
- You can use the same Wized attributes for the social buttons as on the login form
3. Create the Forgot Password form
.png)
.png)
In Wized
1. Add Firebase App
.png)
Go back to the Firebase project > Project settingScroll down until you find the apps section.
.png)
- Scroll down until you find the apps section.
- Copy the api key and app id to Wized.
.png)
2. Add Xano App
.png)
.png)
You can find the base url by going to the created endpoint and copying the endpoint url, and then removing the /firebase/init from the end.
3. Create a Xano Firebase Init Request
.png)
Create a fb_token variable. This will store the token received from firebase. We use a variable to make the request more reusable.
.png)
4. Create the Firebase Auth requests
.png)
.png)
.png)
.png)
5. Create the Sign up logic
Listen for the form submit event and trigger the firebase sign up with email and password request.
.png)
Listen for the successful authentication event and trigger the xano firebase init endpoint.
.png)
.png)
Handle errors
.png)
.png)
- For better looking errors, you should write custom messages for each error type. A full list of codes can be found here: https://firebase.google.com/docs/auth/admin/errors
6. Create the login logic
Listen for the form submit event and trigger the Firebase sign in with email and password request.
.png)
After the Firebase sign in with email and password event, check if it was successful and trigger the firebase init.
.png)
.png)
Handle errors
.png)
.png)
7. Create the Google auth logic
This is common for both the login and the signup pages. It will login the user if it exists or create the user if it doesn't.
.png)
After the Google Auth, check if it was successful.
.png)
.png)
Debugging and seeing the Google response.
- Create a debug element in Webflow
.png)
Create some logic to listen for the event and inject the response data.
.png)
8. Redirect after success
If you want to redirect the user after the login or sign up was successful, run some logic after the xano firebase init request.
.png)
.png)
9. Handling Custom Providers
Wized currently has a limited list of providers.
.png)
.png)
If you need to use a different one, you would need to write custom JS to extend the Wized logic.
9.1 Clone the Finsweet Developer Starter
https://github.com/finsweet/developer-starter
9.2 Install the Firebase npm package
npm install firebase
9.3 Create a firebase.ts file in the utils folder
Go to Firebase > project settings and copy the code into it
.png)
.png)
Add export in front of the const app =
9.4 Create a handleMicrosoftAuth.ts file
This will handle the Microsoft provider logic.
.png)
import { getAuth, OAuthProvider, signInWithPopup } from 'firebase/auth';

import { app } from '$utils/firebase';

const handleMicrosoftAuth = async () => {
  try {
    const auth = getAuth(app);
    const microsoftProvider = new OAuthProvider('microsoft.com');

    const result = await signInWithPopup(auth, microsoftProvider);
    const credential = OAuthProvider.credentialFromResult(result);

    if (!credential) return;
    const { user } = result;

    // Using await to wait for getIdToken to resolve
    const token = await user.getIdToken();

    return token;
  } catch (error) {
    // Handle any errors that occurred during signInWithPopup or getIdToken
    // Optionally, rethrow the error or handle it as per your application's error handling policy
  }
};
9.5 Add this logic to the login and signup pages
- Create an auth.ts file
.png)
import handleMicrosoftAuth from '$utils/firebase/handleMicrosoftAuth';

window.Wized = window.Wized || [];
// eslint-disable-next-line @typescript-eslint/no-explicit-any
window.Wized.push((Wized: any) => {
  const microsoftBtn = document.querySelector('[wized="auth_microsoft"]') as HTMLElement;

  if (microsoftBtn) {
    microsoftBtn.addEventListener('click', async () => {
      const token = await handleMicrosoftAuth();

      if (token) {
        Wized.data.v.fb_token = token;
        Wized.requests.execute('xano_firebase_init');
      }
    });
  }
});
9.6 Get rid of the TS issues
In utils create a types folder. Add a custom-window.d.ts file in it.
.png)
type WizedFunction = (callback: (Wized) => void) => void;

interface Window {
  Wized?: WizedFunction[];
}

declare global {
  interface Window {
    Wized?: WizedFunction[];
  }
}
9.7 Add the auth.ts file to the build.js
.png)
9.8 Test locally
If you want to test it locally, run pnpm run dev in the console. Copy the script to Webflow, on the login and signup pages.
.png)
.png)
9.8 Deploy
For deployment, you can use a platform like jsdelivr, cloudflare pages, or vercel.
We use Cloudflare pages at PixelMakers.
To deploy on Cloudflare pages:
- Create a GitHub repository and push the changes.
.png)
.png)
Run the following commands in the VS Code terminal (the instructions from github, with . instead of readme at git add)
git init
git add .
git commit -m "first commit"
git branch -M main
git remote add origin [github url]
git push -u origin main
If you receive an origin error, run the following command and then rerun the commands above
git remote rm origin
Go to cloudflare.com ➝ workers & pages ➝ create application
.png)
Select pages
.png)
Connect to git and add your github account
.png)
Add the following settings. For NODE_VERSION, go to nodejs.org and add the latest LTS version
.png)
.png)
- After, click save and deploy
- After it was successful, click continue
Click on visit site
.png)
To test if the build was ok, add /auth.js at the end. If you see some code, it was ok.
.png)
Go to Webflow and replace the script src with the deployed link
.png)

